About Webflow
Webflow is the platform your website is built on, think of it as a premium website builder and content management system all in one.
We've taken care of the design and development. From here, your role is to keep the content up to date and relevant.
The best part? You have full control over your content without needing to rely on us for everyday changes. Update a headline in seconds, publish a new blog post, or swap out an image with just a couple of clicks.
Marketer & Content Editor — for safe, day-to-day content updates.
Designer — full access to layout, structure, and styling.
If you have access to the Designer, be mindful that changes here can affect the structure and layout of the entire site. For most updates, we recommend using the Editor unless you're confident working with the design.
Update text, swap images, write blog posts, manage your team's access, and publish changes — all from your browser. The design and structure we built are protected, so you can't accidentally break the look of the site.
Getting started
Site Admin — Full Workspace Access
You have full control over the Webflow workspace — site design, CMS, team members, and billing. We recommend taking your time getting familiar. Mistakes at this level can affect the entire site.
Team Member — Editor Access Only
You can safely update content without touching the design or layout. Stick to the Editor for all day-to-day updates.
Jump to what you need
Your workspace
Your central hub for managing sites, team members, and billing. Here's everything you need to know to get around.
The Dashboard
The first thing you see when you log in at webflow.com. Every site we've built for you appears here as a card — hover over one to open it or jump into its settings.
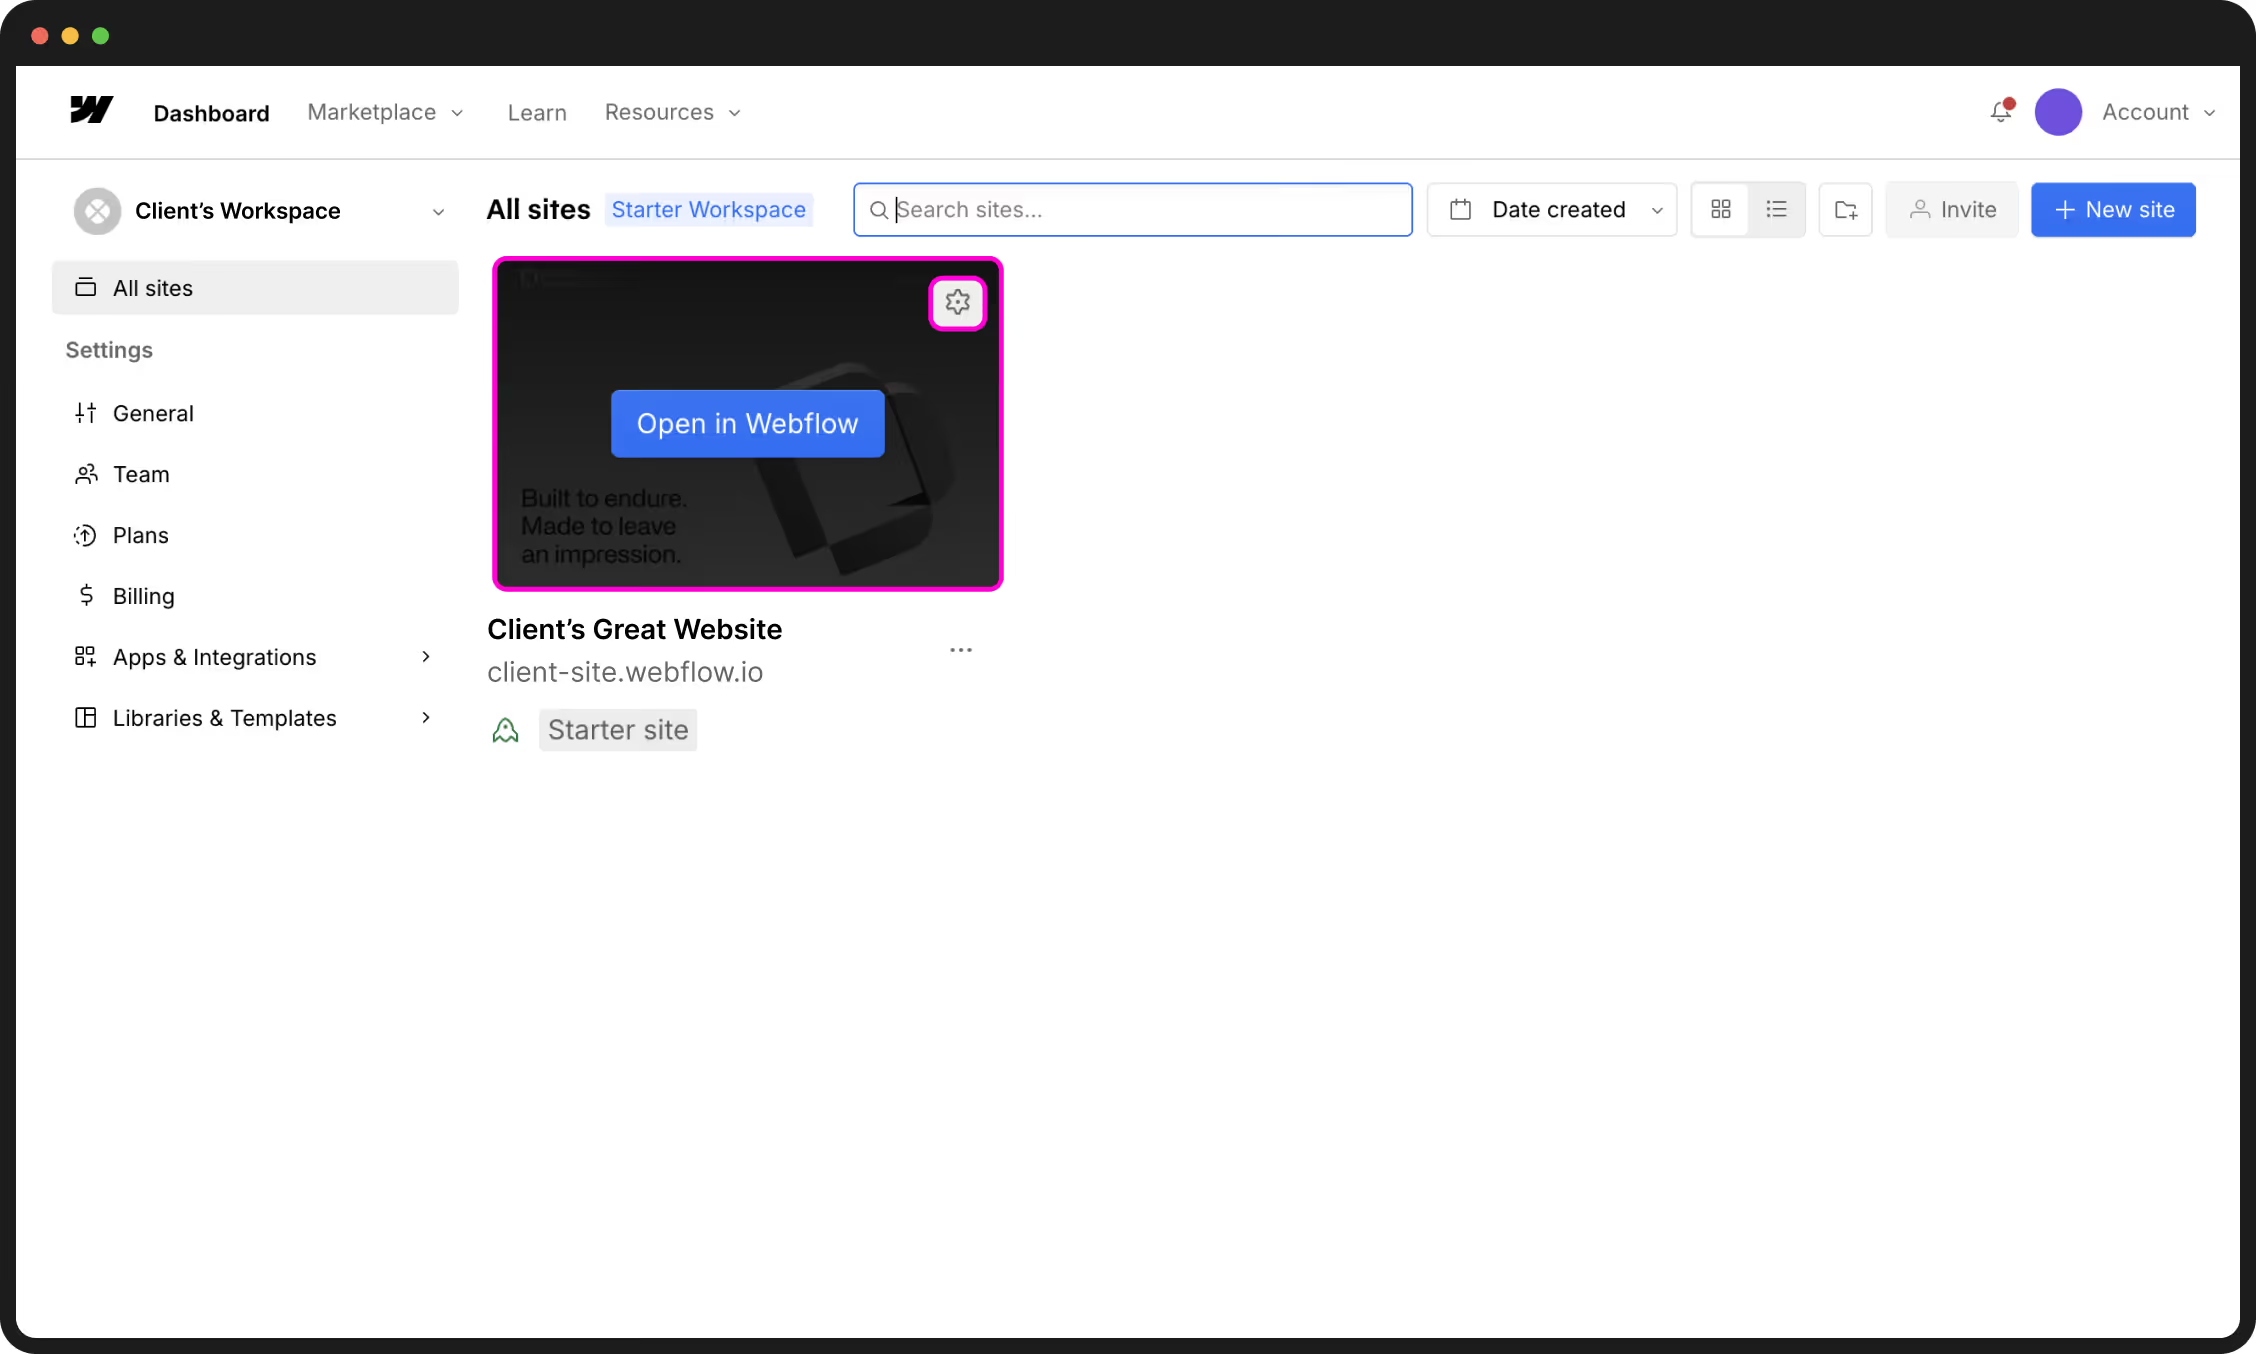
- Each card is one website. Hover to reveal the Open and Settings buttons.
- Left sidebar — navigate between sections and access Workspace Settings.
Workspace settings
Access these by clicking your workspace name in the Webflow sidebar, then selecting Workspace Settings.
General
- Update your workspace name and logo.
- Toggle Webflow AI on or off — this controls AI features like meta description generation and alt text suggestions.
Team
- View all current members and their roles.
- Invite new members by email and assign a role on the way in.
- Change or remove someone's access at any time.
- See pending invitations that haven't been accepted yet.
Plan
- Manage your workspace-level plan — separate from individual site plans. Most clients with two sites or fewer don't need a paid workspace plan.
Billing
- View invoices, your current plan, and payment details.
These tabs are only accessible to the Workspace Owner and Admins. If you can't see them, your role doesn't include that level of access — reach out to us if you need something changed.
Site settings
While the Designer is where you build, Site Settings is the engine room. This is where we manage the "behind-the-scenes" logic, from domain connections and hosting to security backups and integration hooks.
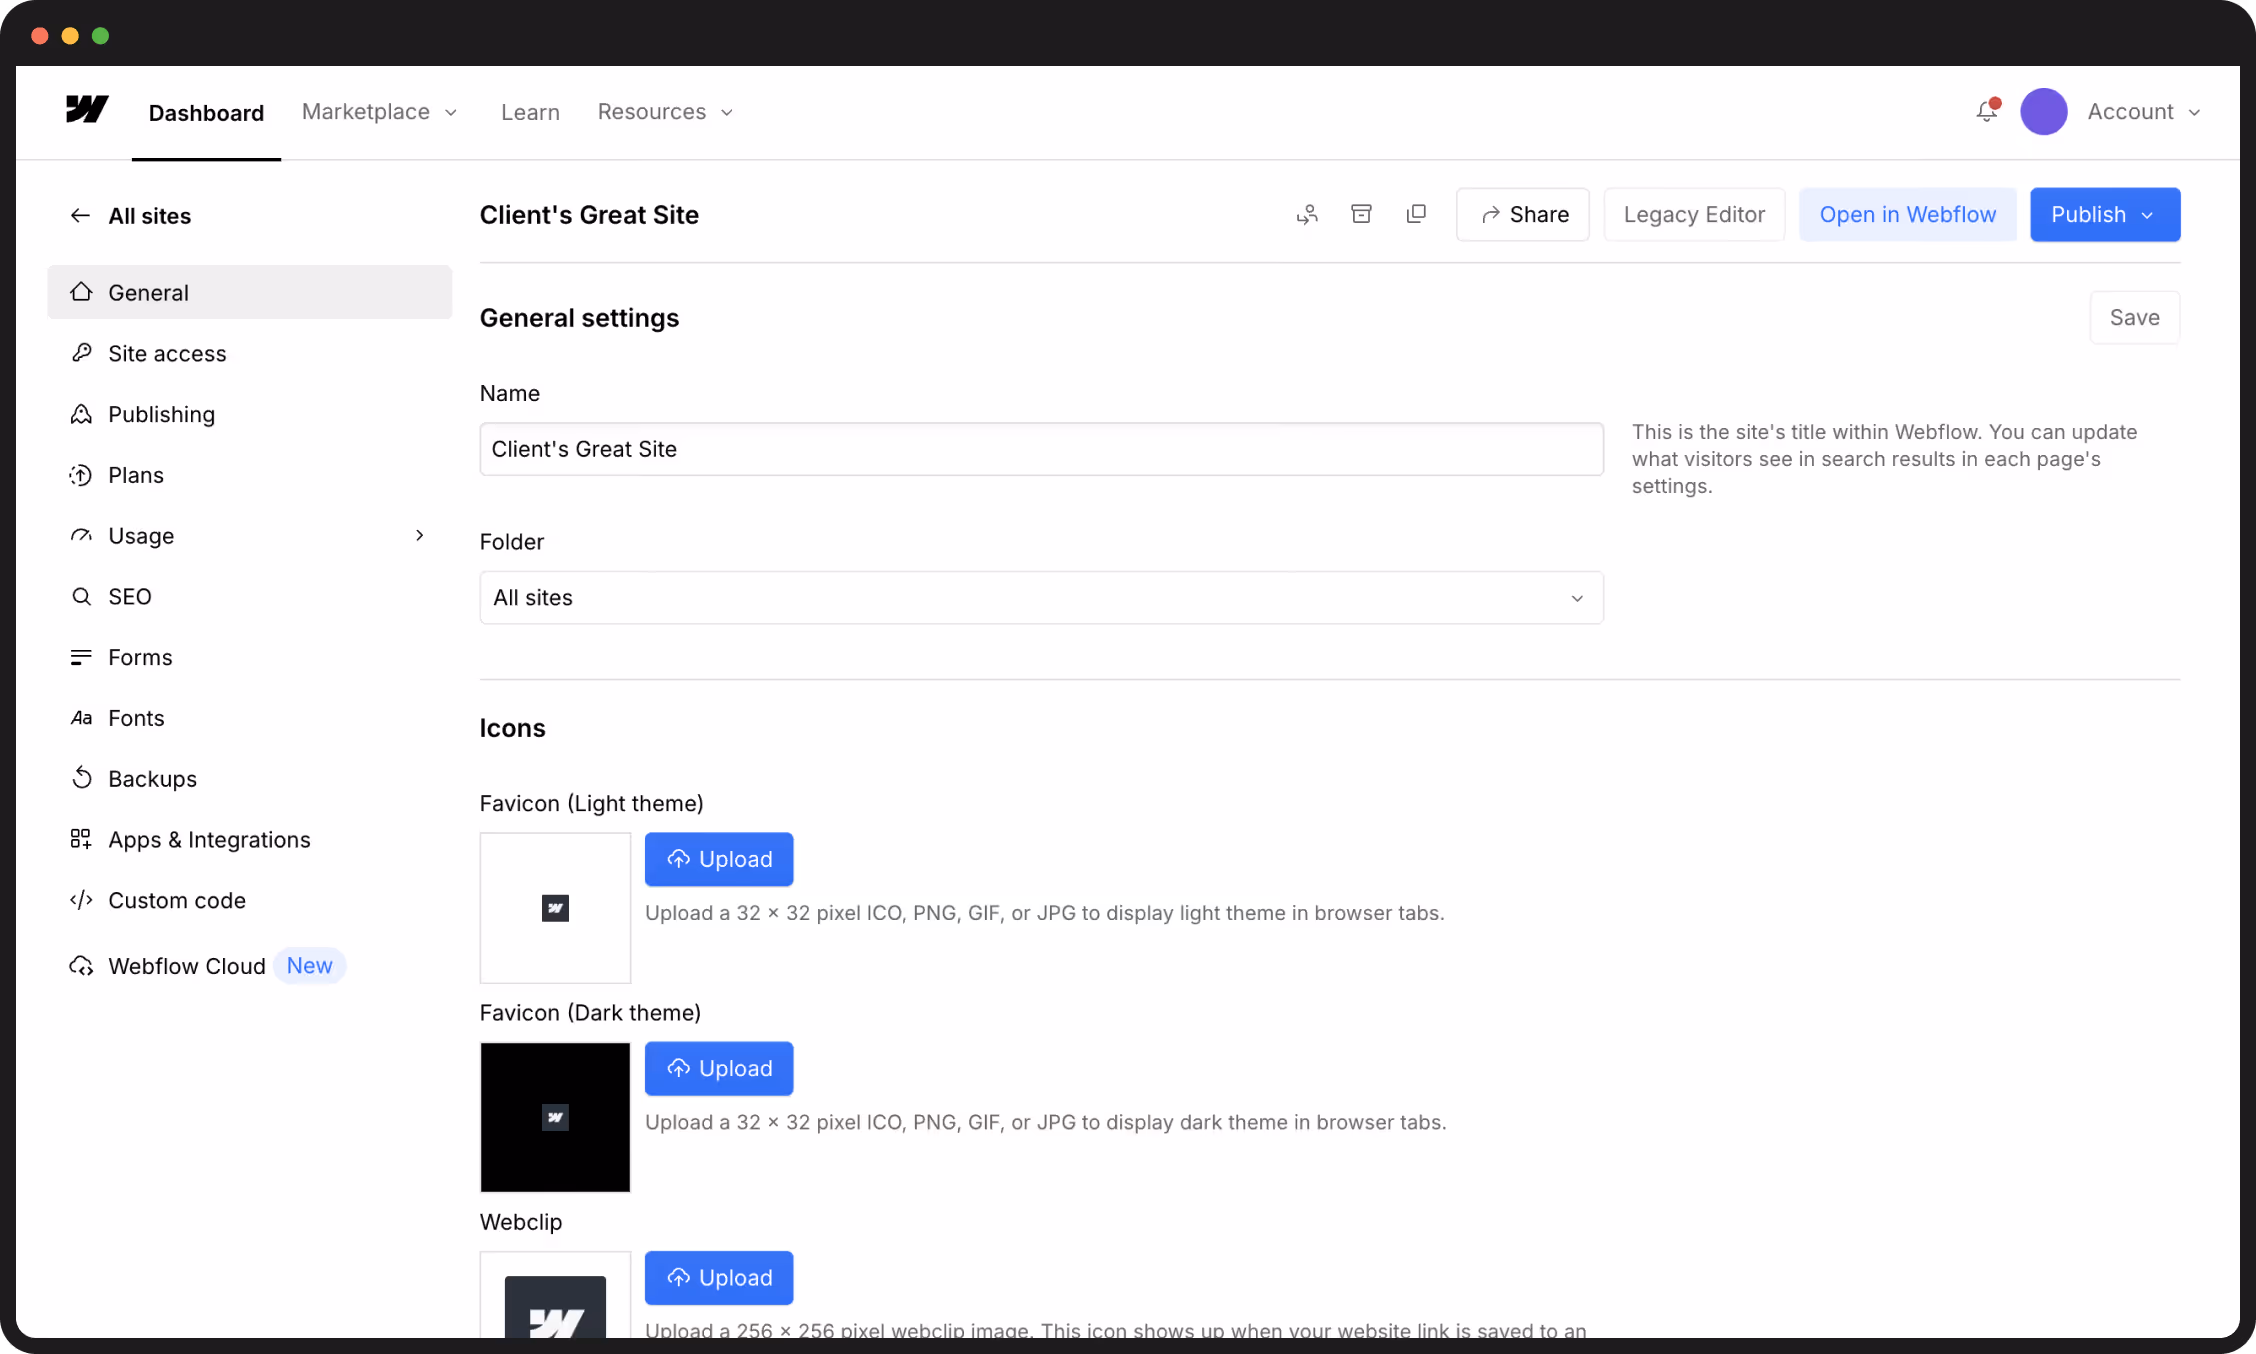
General Configuration
Most of these settings are "set and forget," but they provide a vital overview of your site's health.
- Favicon & Webclip — The brand icons that appear in browser tabs and on smartphone home screens. We have already optimised and uploaded these for you.
- Time Zone — We've set this to your local region to ensure any scheduled CMS content (like blog posts) goes live exactly when you expect.
- Usage Overview — Located at the bottom of the General tab. This is your dashboard for monitoring CMS item counts, monthly visitor traffic, and bandwidth usage. It’s the best place to check if you’re approaching your plan limits.
Publishing & Domains
The Publishing tab manages how the world (and your team) views the site.
- Production Domain — This is your live web address (e.g.,
yourcompany.com.au). We have configured the DNS and SSL security for you. Please avoid altering these settings, as a single incorrect record can take your entire digital presence offline. - Staging Environment — Every site has a secondary
.webflow.ioaddress. This is your private "testing lab." Changes published here are invisible to the public, making it the perfect place to review new content or features before they go live.
Always publish to your Staging Domain first. Review the changes on both desktop and mobile; once you are 100% satisfied, push the update to your Production Domain. This simple habit prevents public-facing errors.
Forms & Lead Handling
If your site uses native Webflow forms, this tab acts as your temporary database and notification centre.
- Submission Storage — View every enquiry your site has ever received. If an email notification is missed, the data is always safely stored here.
- CSV Export — You can download your entire lead history as a spreadsheet at any time. We recommend doing this once a quarter as an offline backup.
Version History (Backups)
Webflow takes automatic "snapshots" of your site frequently, but you can also create manual restore points. This is your ultimate safety net.
- Restore Points — If a design change goes wrong or content is accidentally deleted, you can roll back the entire site to a previous version in seconds.
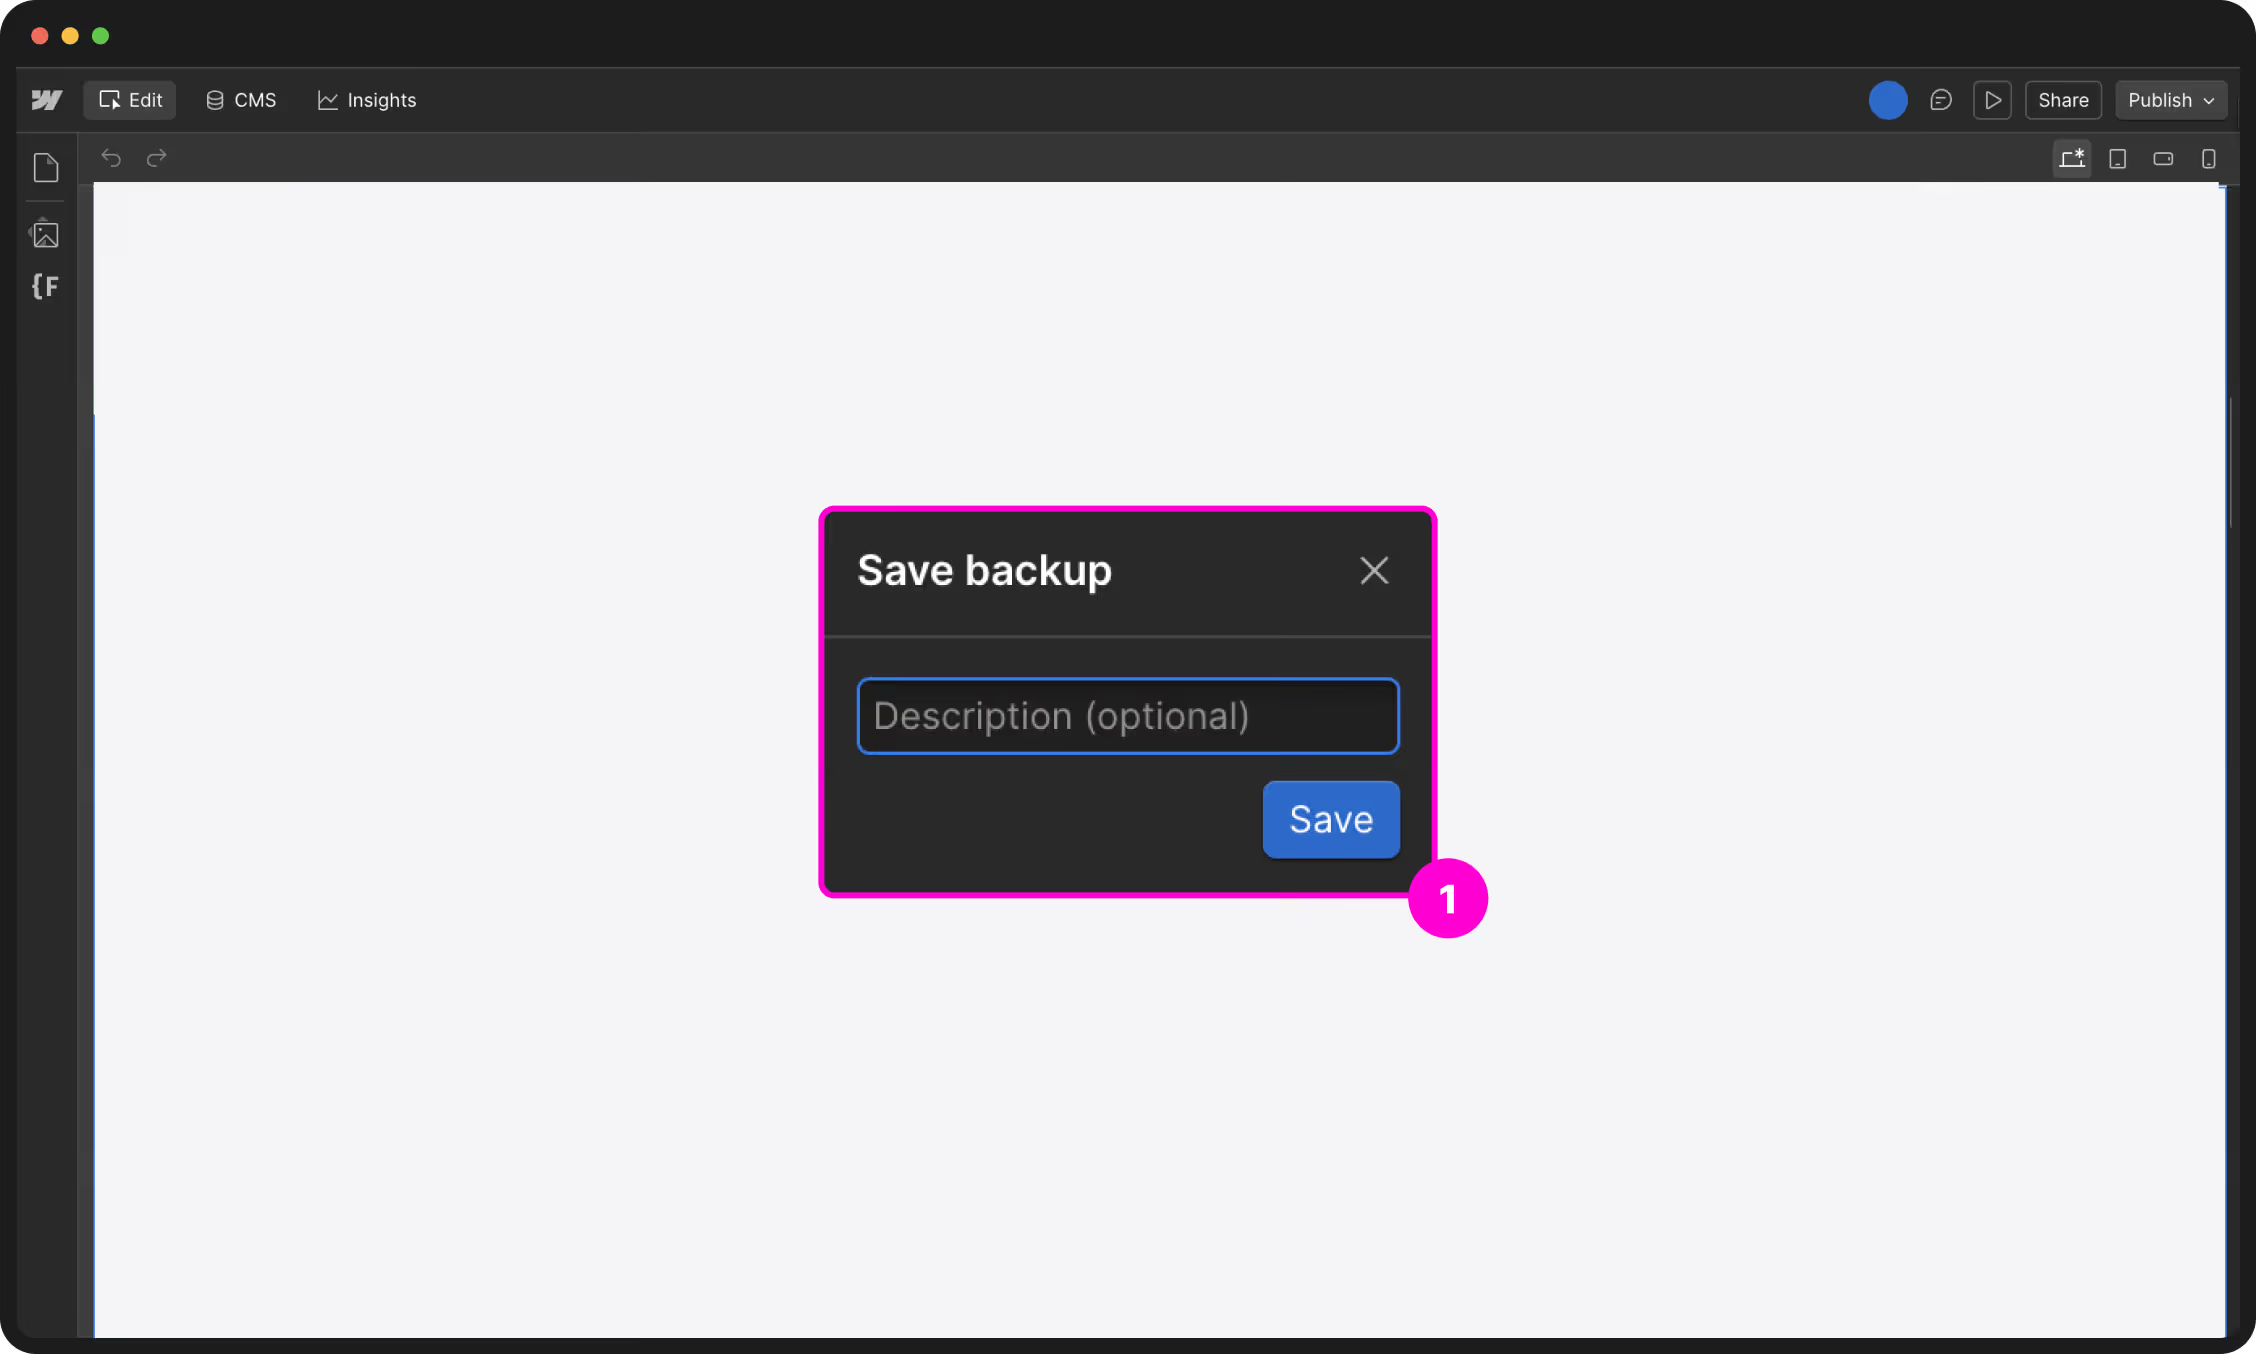
- Manual Backups — To create a named backup in the Designer, press
Shift + Cmd + S. Do this before any major editing session so you have a clean "save game" to return to.
While you can manage Billing & Plans here, please double-check with us before downgrading or removing "Add-ons." Some plan features (like CMS limits or Logic flows) are critical to your site's functionality; removing them can cause immediate site-wide errors.
The Apps & Integrations tab allows us to connect your site to powerful third-party tools (like HubSpot, Zapier, or Mailchimp). If you're looking to automate your marketing or sync your site data with your CRM, let's discuss the best technical architecture for your needs.
Roles & permissions
Webflow’s permission system is designed to empower your team. By assigning the right roles, you ensure everyone has the tools they need to update the site without the risk of accidentally altering the core design or breaking the code.
You will see U&I Digital listed in your Workspace. Because we are a certified Webflow Agency, we join your Workspace as a "Guest Team." This is a free feature that allows us to provide ongoing support and maintenance without using up one of your paid seats or adding to your monthly bill.
Understanding Workspace Seats
Before assigning a role, a user needs a seat—essentially a licence to enter your Workspace. To keep your overheads low, we recommend only adding "Full" seats for those who genuinely need to manage the site's back-end.
| Seat Type | Best For | Cost |
|---|---|---|
| Full Seat | Internal developers or primary site admins. | Paid |
| Limited Seat | Marketing managers and content creators. | Paid (Reduced) |
| Reviewer Seat | Stakeholders providing feedback only. | Free (up to 100) |
Site Roles: The Breakdown
Once a user has a seat, you assign them a Role. This determines exactly what buttons they can see and what changes they can publish.
| Role | Capabilities | Risk Level |
|---|---|---|
| Site Manager | Full design access, team management, and publishing. | Highest |
| Marketer | Can edit content and create new pages from existing templates. | Medium |
| Content Editor | Updating text, images, CMS items, and SEO metadata. | Low |
| Reviewer | Viewing the site and leaving pinned comments/feedback. | None |
Roles like Site Manager or Designer grant access to the "Design Canvas." This allows for structural changes, global style overrides, and code edits. Unless you are comfortable troubleshooting CSS or layout logic, we strongly recommend using the Content Editor or Marketer roles for daily updates. If you need a structural design change, we are always here to handle it safely.
Inviting a Team Member
You can invite users to your entire Workspace (all sites) or restrict them to a single project.
Invite to a Specific Site (Recommended)
As your internal marketing department grows, you may need more complex permission structures or custom "Page Branching" workflows. If you're finding the standard roles too restrictive, let's chat about moving to an Enterprise-level setup.
Editing site content
Content editors and marketers can update site copy, media, and CMS content without changing design. Edit/Build Mode lets you update text, images, links, and components directly on your live website — you see exactly how it looks before anything goes live. No code, no complexity.
Make sure you're working in Edit or Build mode (depending on your access level). These are the correct environments for updating content. If you find yourself in the Designer, be aware this is the full design environment — changes made here can affect the layout and structure of your site.
If you've landed in the Designer, you can switch to a safer editing view by using Preview and selecting the Marketer or Content Editor role. For all day-to-day updates, we recommend staying in Edit or Build mode unless you're confident working with web design.
Opening Edit Mode
Option A — from the Dashboard
Option B — the shortcut URL
Add ?update to the end of any page URL on your live site:
Press Enter — you're in Edit Mode on that exact page instantly. Bookmark this for your homepage and most-edited pages.
Every edit saves as a draft automatically as you type. Nothing goes live until you click Publish.
Multiple team members can work in Webflow at the same time. Members with the content editing role can edit static and dynamic site content. If multiple people are editing the same content at the same time, the last edits "win" — so coordinate editing times with your teammates.
How to edit site content
Edit text, links, and images (static content)
When you hover over an editable element (text, links, images), a blue outline appears. Click it and an Edit icon appears above it — a pencil for text, a link icon for hyperlinks, a landscape icon for images.
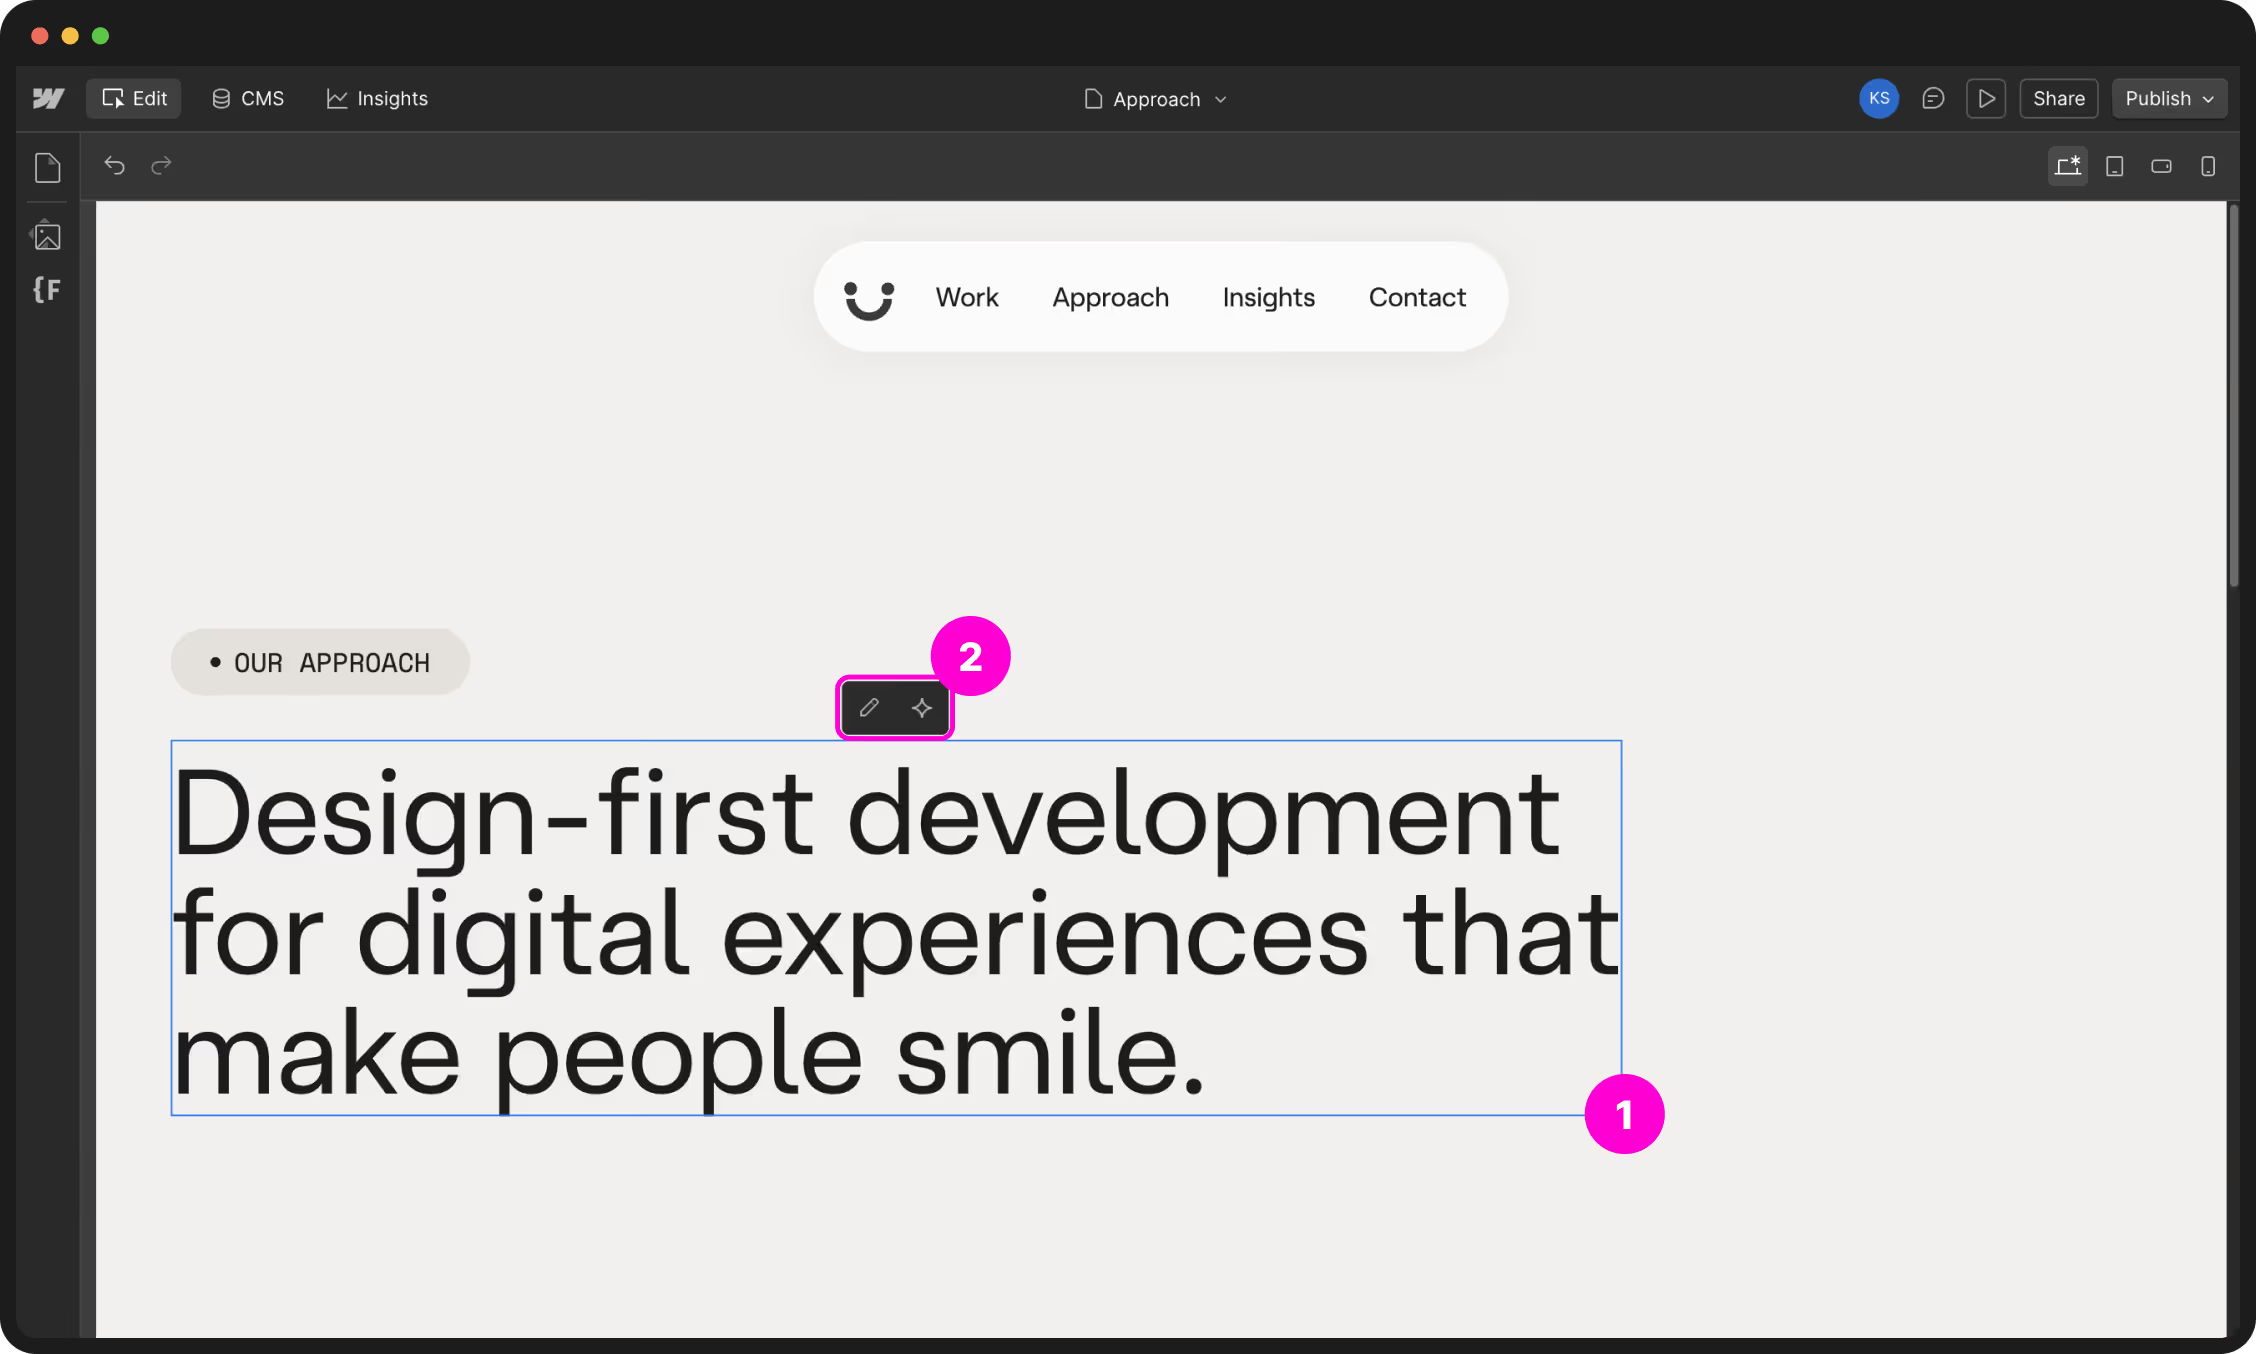
While editing text, you can select text and format it — bold, italicise, wrap with a span — using the menu that appears above the selection.
Editing components
Components are reusable design blocks — your navigation, footer, card layouts, testimonials. Content bound to a prop can be edited locally, meaning changes you make do not replicate across all instances of that component.
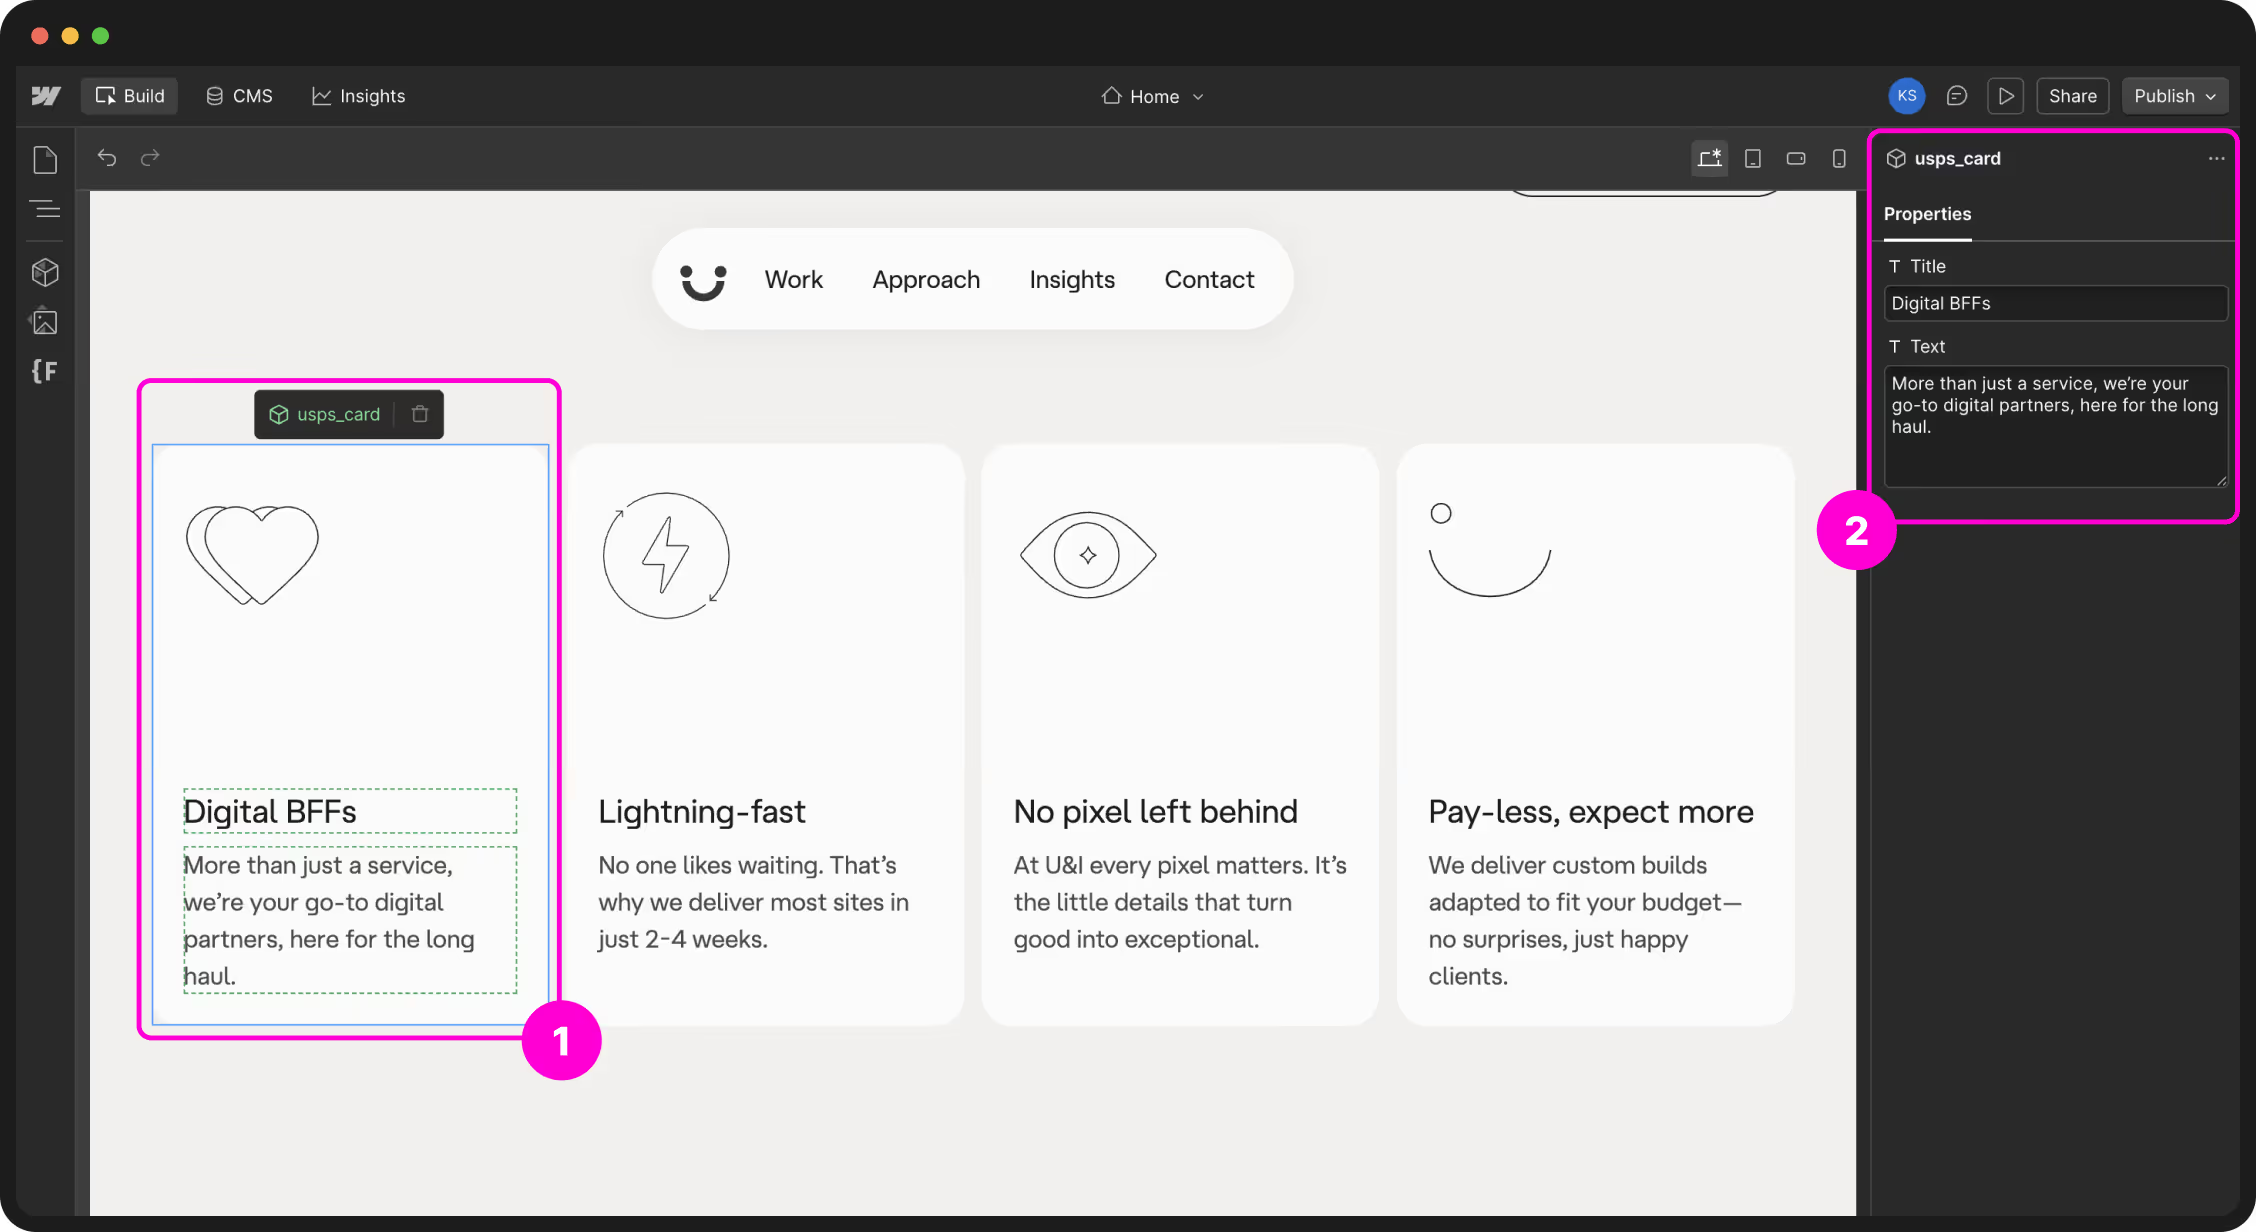
Global content is content that is not bound to a prop. Editing unbound content impacts all instances of the component — the change is applied everywhere the component exists. To make the same changes across all instances, edit the content in the main component. Double-click the component instance on the canvas and hover over the unbound content.
Content bound to a prop can be edited locally, meaning the changes you make do not replicate across all instances of that component. Learn how to edit content bound to a prop.
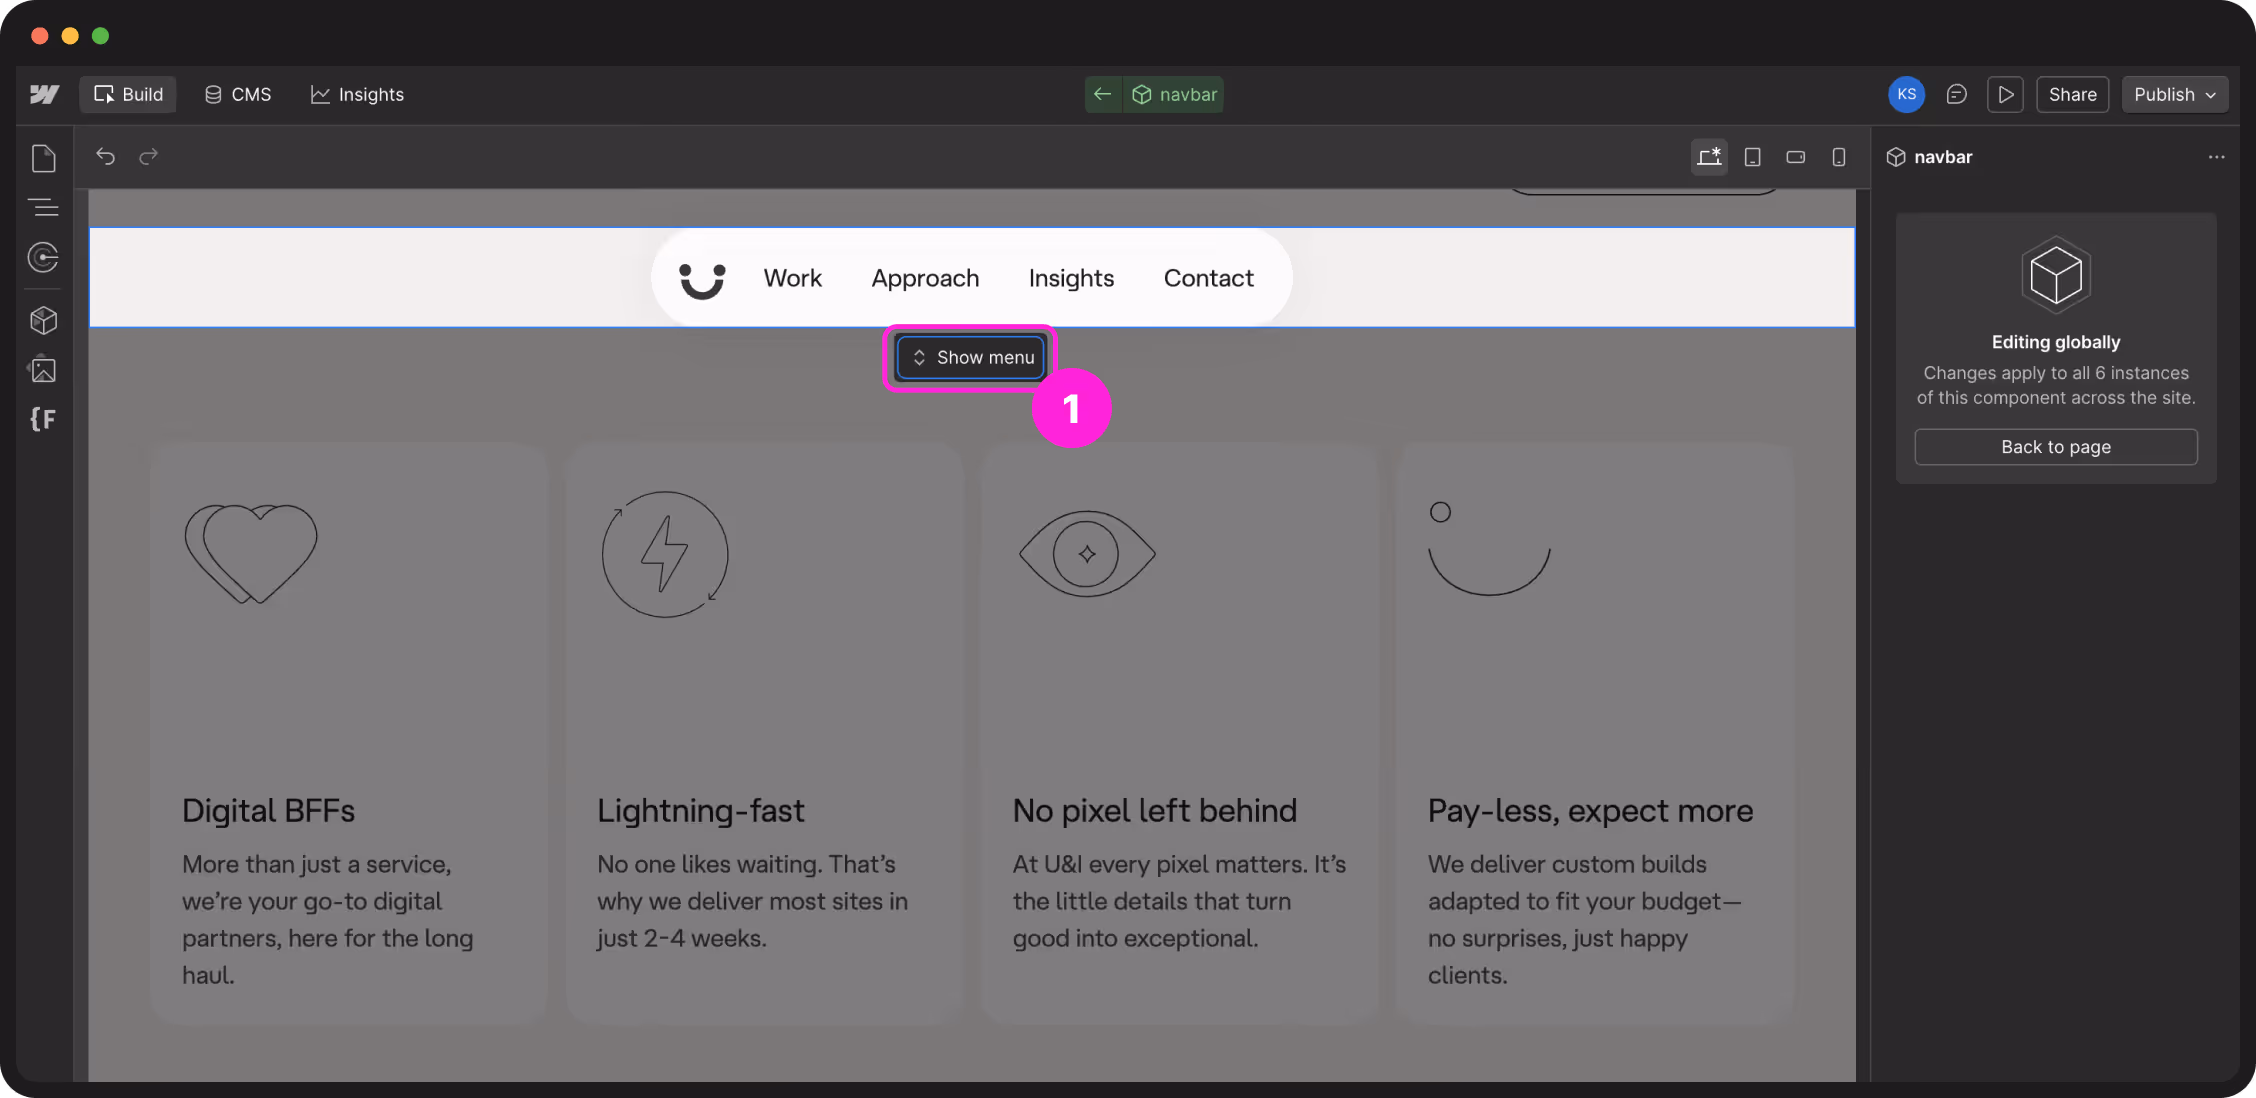
Edit interactive elements on the canvas
Interactive elements like sliders, tabs, dropdowns, and nav bars often hide part of their content until interacted with. You can access and edit this hidden content using floating menu options.
CMS & dynamic content
Some parts of your site use dynamic content powered by the CMS — things like blog posts, case studies, or team members. Updates are managed in one place and automatically applied across the site. Head to the CMS Content section for the full guide.
Page settings
Page Settings control the individual setup of each page — SEO details, page name, and visibility. Head to the Pages & structure section to learn how and when to use these settings.
How to publish as a content editor
Publishing is what makes your changes go live. Until you publish, all edits remain in draft and are invisible to visitors. Head to the Publishing section to learn when and how to publish safely.
CMS content
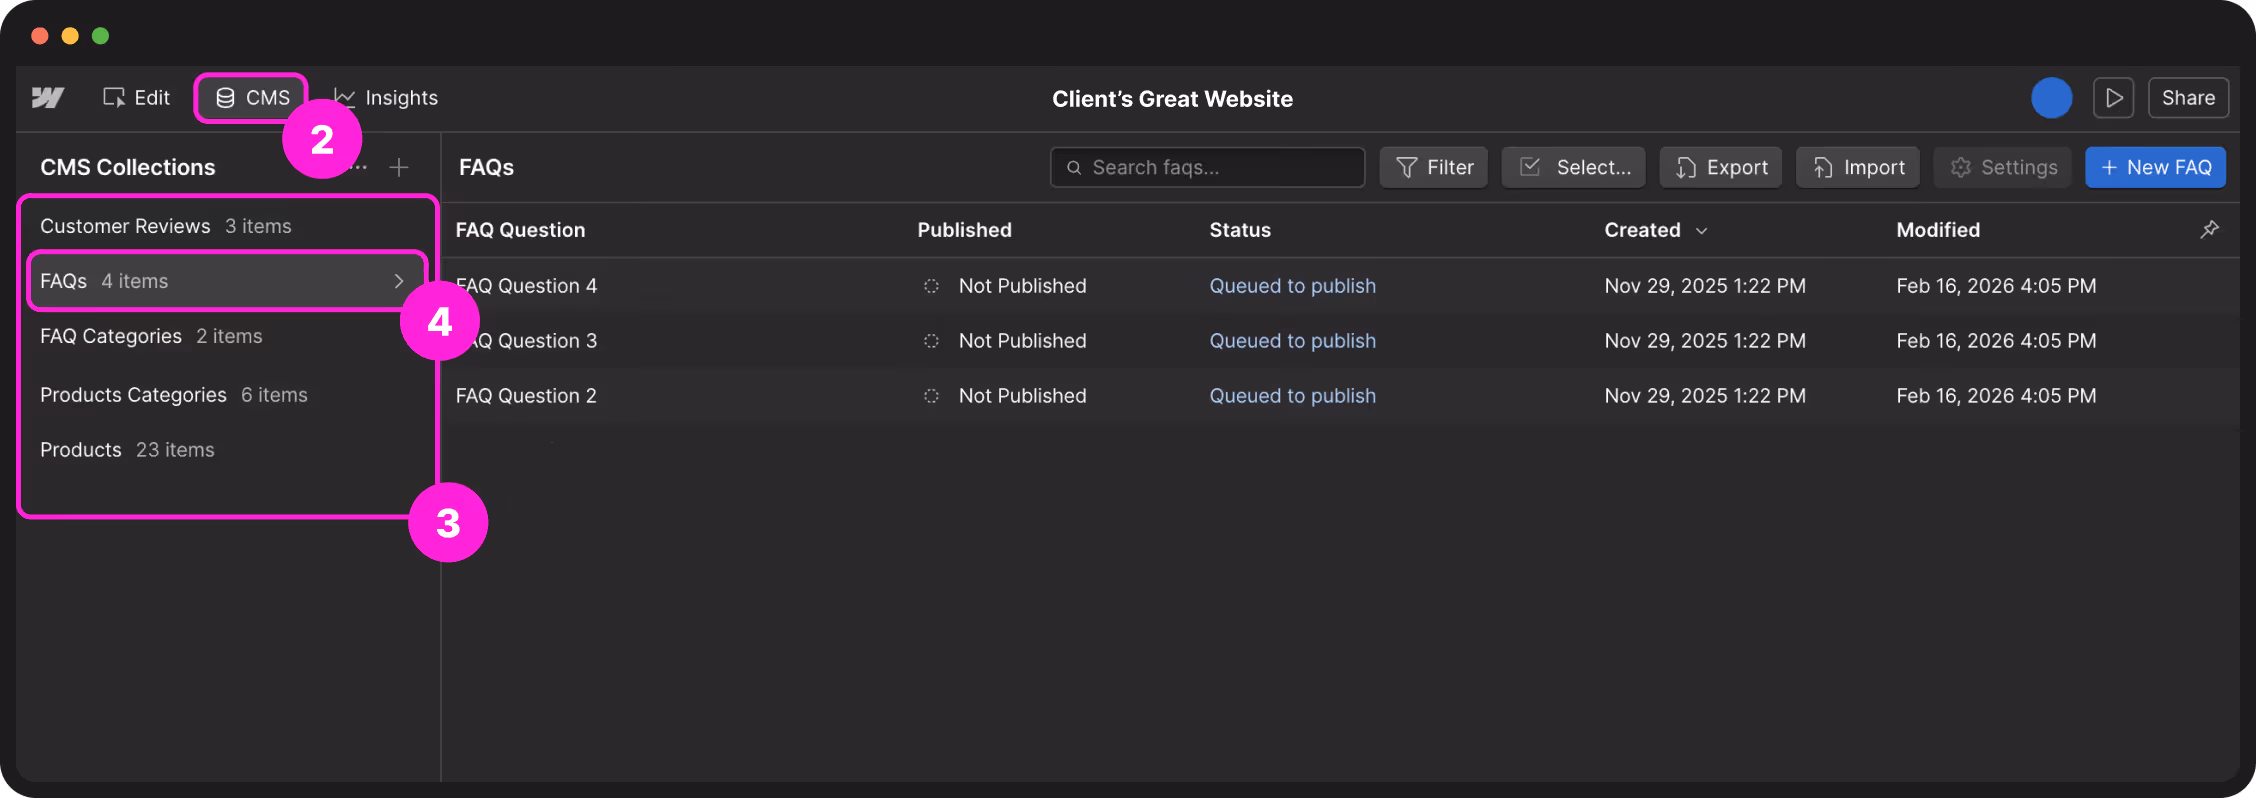
The CMS is where your structured, repeating content lives — blog posts, team profiles, case studies, news. Each type has its own Collection; each individual entry is a Collection item.
Opening the CMS panel
CMS content: functional vs. content items
Not all CMS items are the same. In Webflow, you'll often see two types:
| Type | What it does | Examples |
|---|---|---|
| Content items | Hold the content your visitors see. Updating these changes what's displayed on the site. | Blog posts, team profiles, case studies |
| Functional items | Control site structure or functionality, or are referenced by other CMS items. Editing these can affect how the site works. | Navigation links, categories, filters |
Only touch functional items if you're confident about their role in the site's structure.
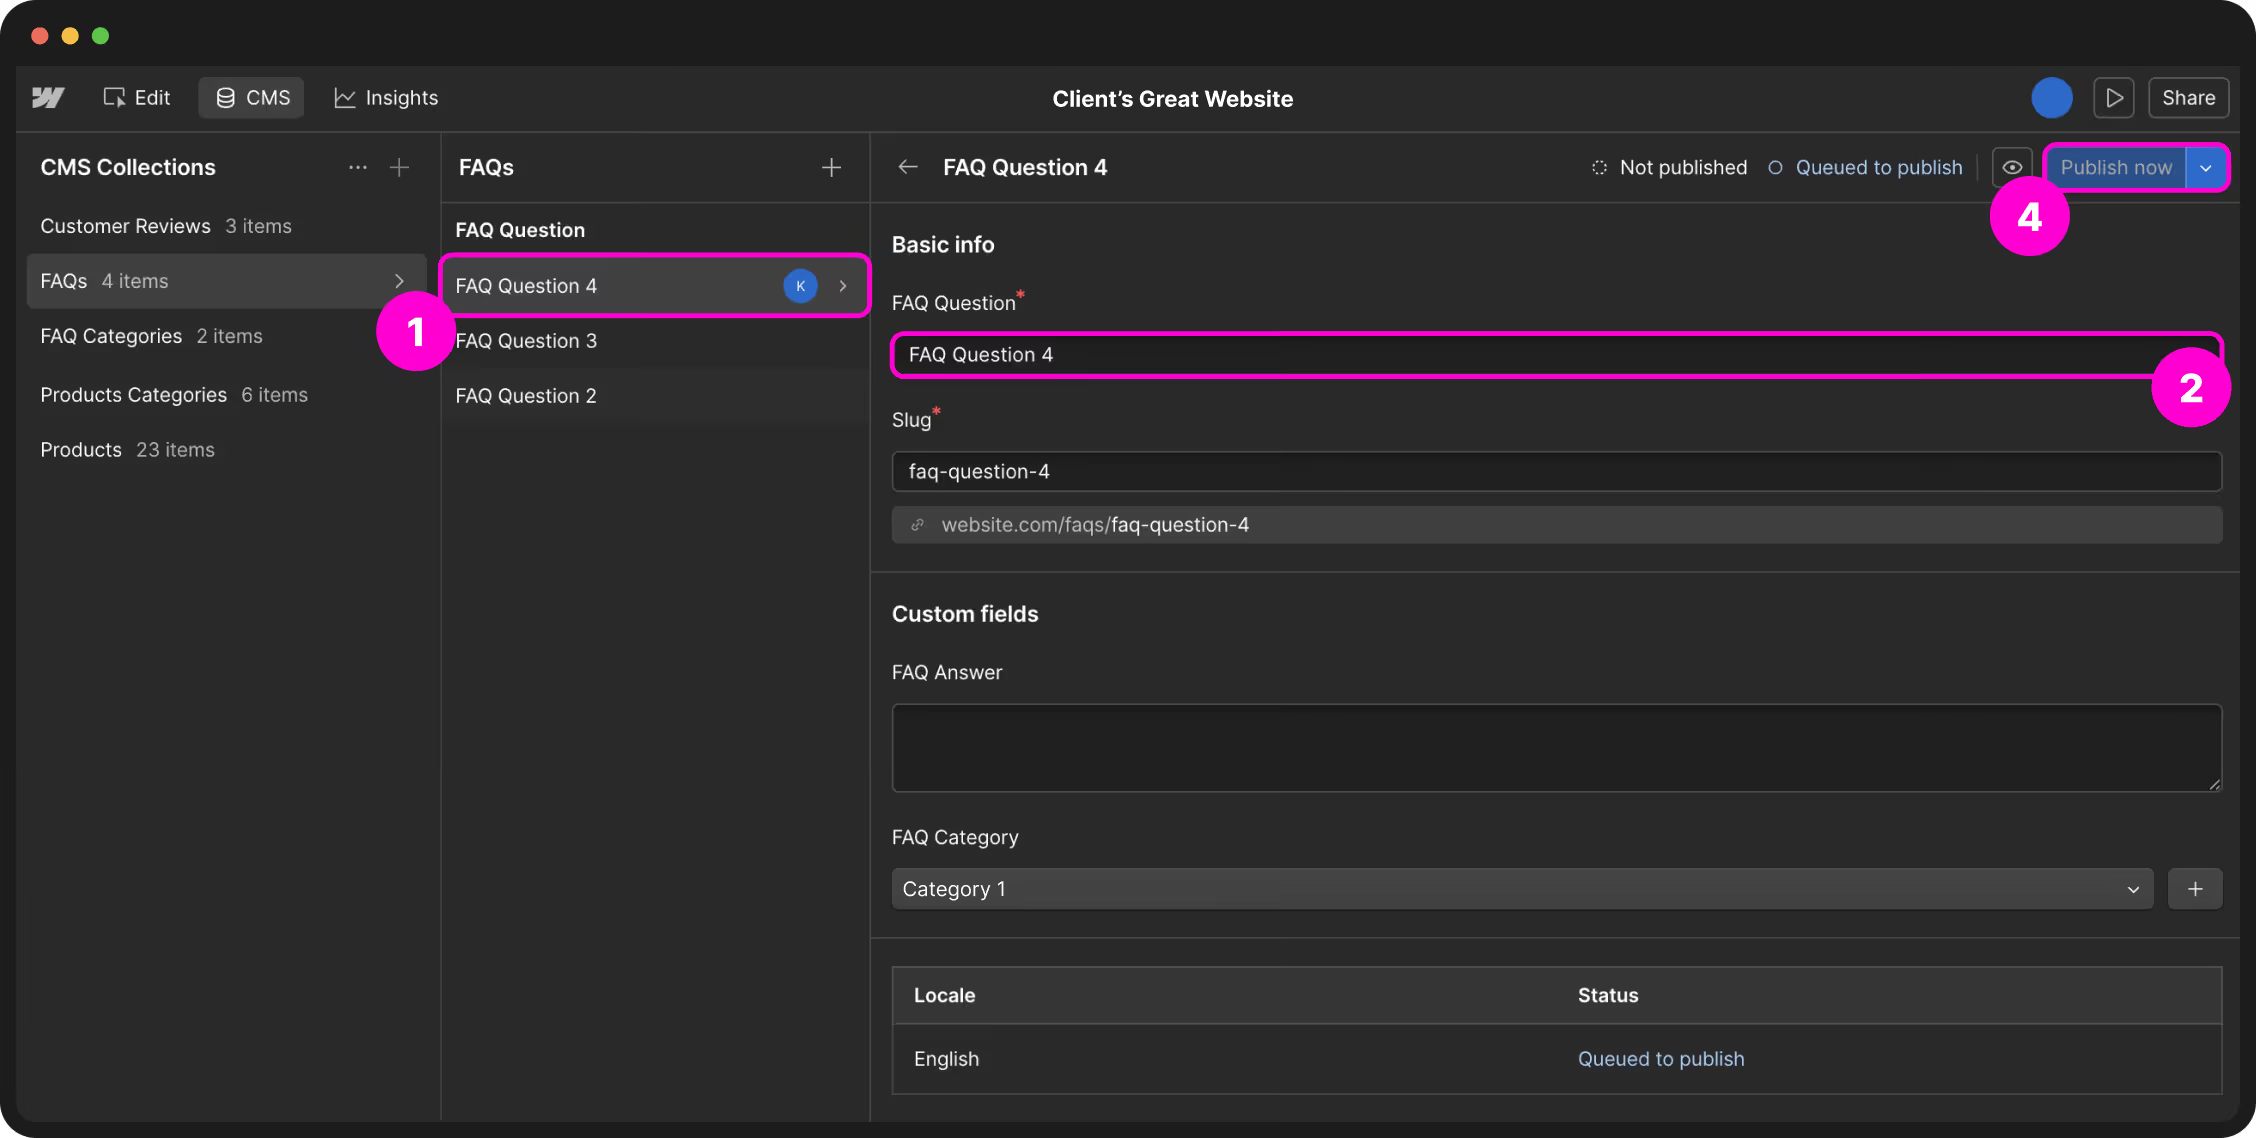
Editing an existing CMS item
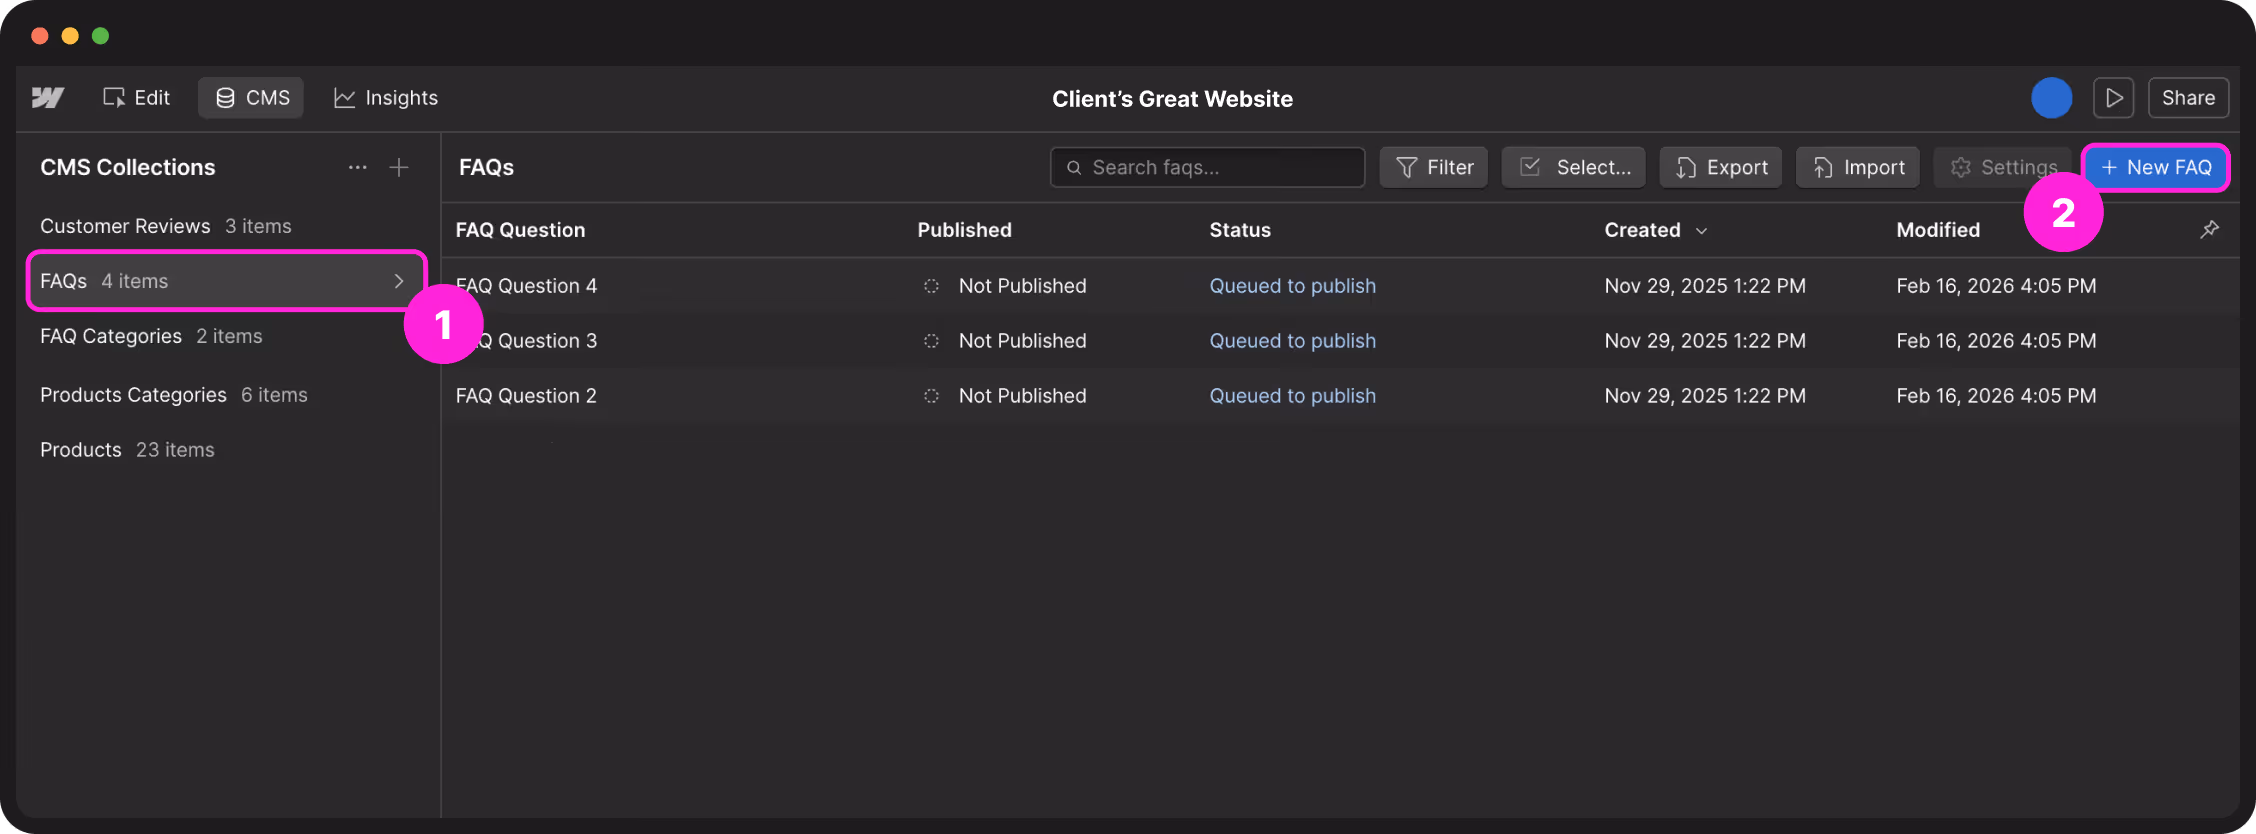
Create a new CMS item
Double-check required fields (marked with a *) before publishing to avoid incomplete entries going live.
Referencing CMS items
Some CMS items are linked to others to keep your site dynamic and organised. For example, a blog post might reference a category or tag, or a case study might reference a team member.
- Changing the content of a referenced item (like a category name) can affect all CMS items that use it.
- Always double-check which items are connected before editing or deleting a functional or reference item.
- For day-to-day updates, focus on content items rather than functional ones unless you're confident about their role.
You can usually see references in the CMS item editor — look for fields that link to other collections. This helps you understand how changes might ripple across the site.
Using CMS previews & drafts
Before publishing, preview your CMS content to see how it will appear on the live site without affecting what visitors see.
- Open a CMS item and click Preview to see how it will look on the page.
- In Preview mode you can make edits directly on the canvas — these save as drafts until you publish.
- Drafts let you save changes without publishing immediately.
- Only publish when you're confident the content is correct and complete.
When your item references other CMS content or uses dynamic layouts, preview first so you can check everything displays correctly before going live.
Bulk edits
Need to update many posts at once? CMS panel → Collection → click the ⋯ three-dot menu → choose Export or Import. Edit in a spreadsheet, then bring it back in.
Bulk publish & unpublish

If you need to publish or unpublish multiple CMS items at once, use Webflow's bulk edit feature.
Other fields should be updated individually to avoid mistakes. Preview your changes before publishing to make sure everything looks correct.
Deleting CMS items safely
There are two ways to remove content from your site. Understanding the difference helps prevent accidental loss.
| Action | What happens | When to use |
|---|---|---|
| Set to Draft | Removes from the live site but keeps it in your CMS. References stay intact so other items won't break. | Temporary removal, or when you may want to republish later |
| Delete | Permanently removes the item. Any other items referencing it may break. | Only when you're certain it's no longer needed |
Drafting is reversible and safer for your site's structure. There is no undo for deleted CMS items.
Publishing changes
Nothing on your site goes live until you decide it’s ready. You have the freedom to edit, experiment, and redesign as much as you like because your live website remains exactly as it is until you hit the Publish button.
Final review before you publish
Run through this list before every update. Click each item to check it off.
Publishing the whole site
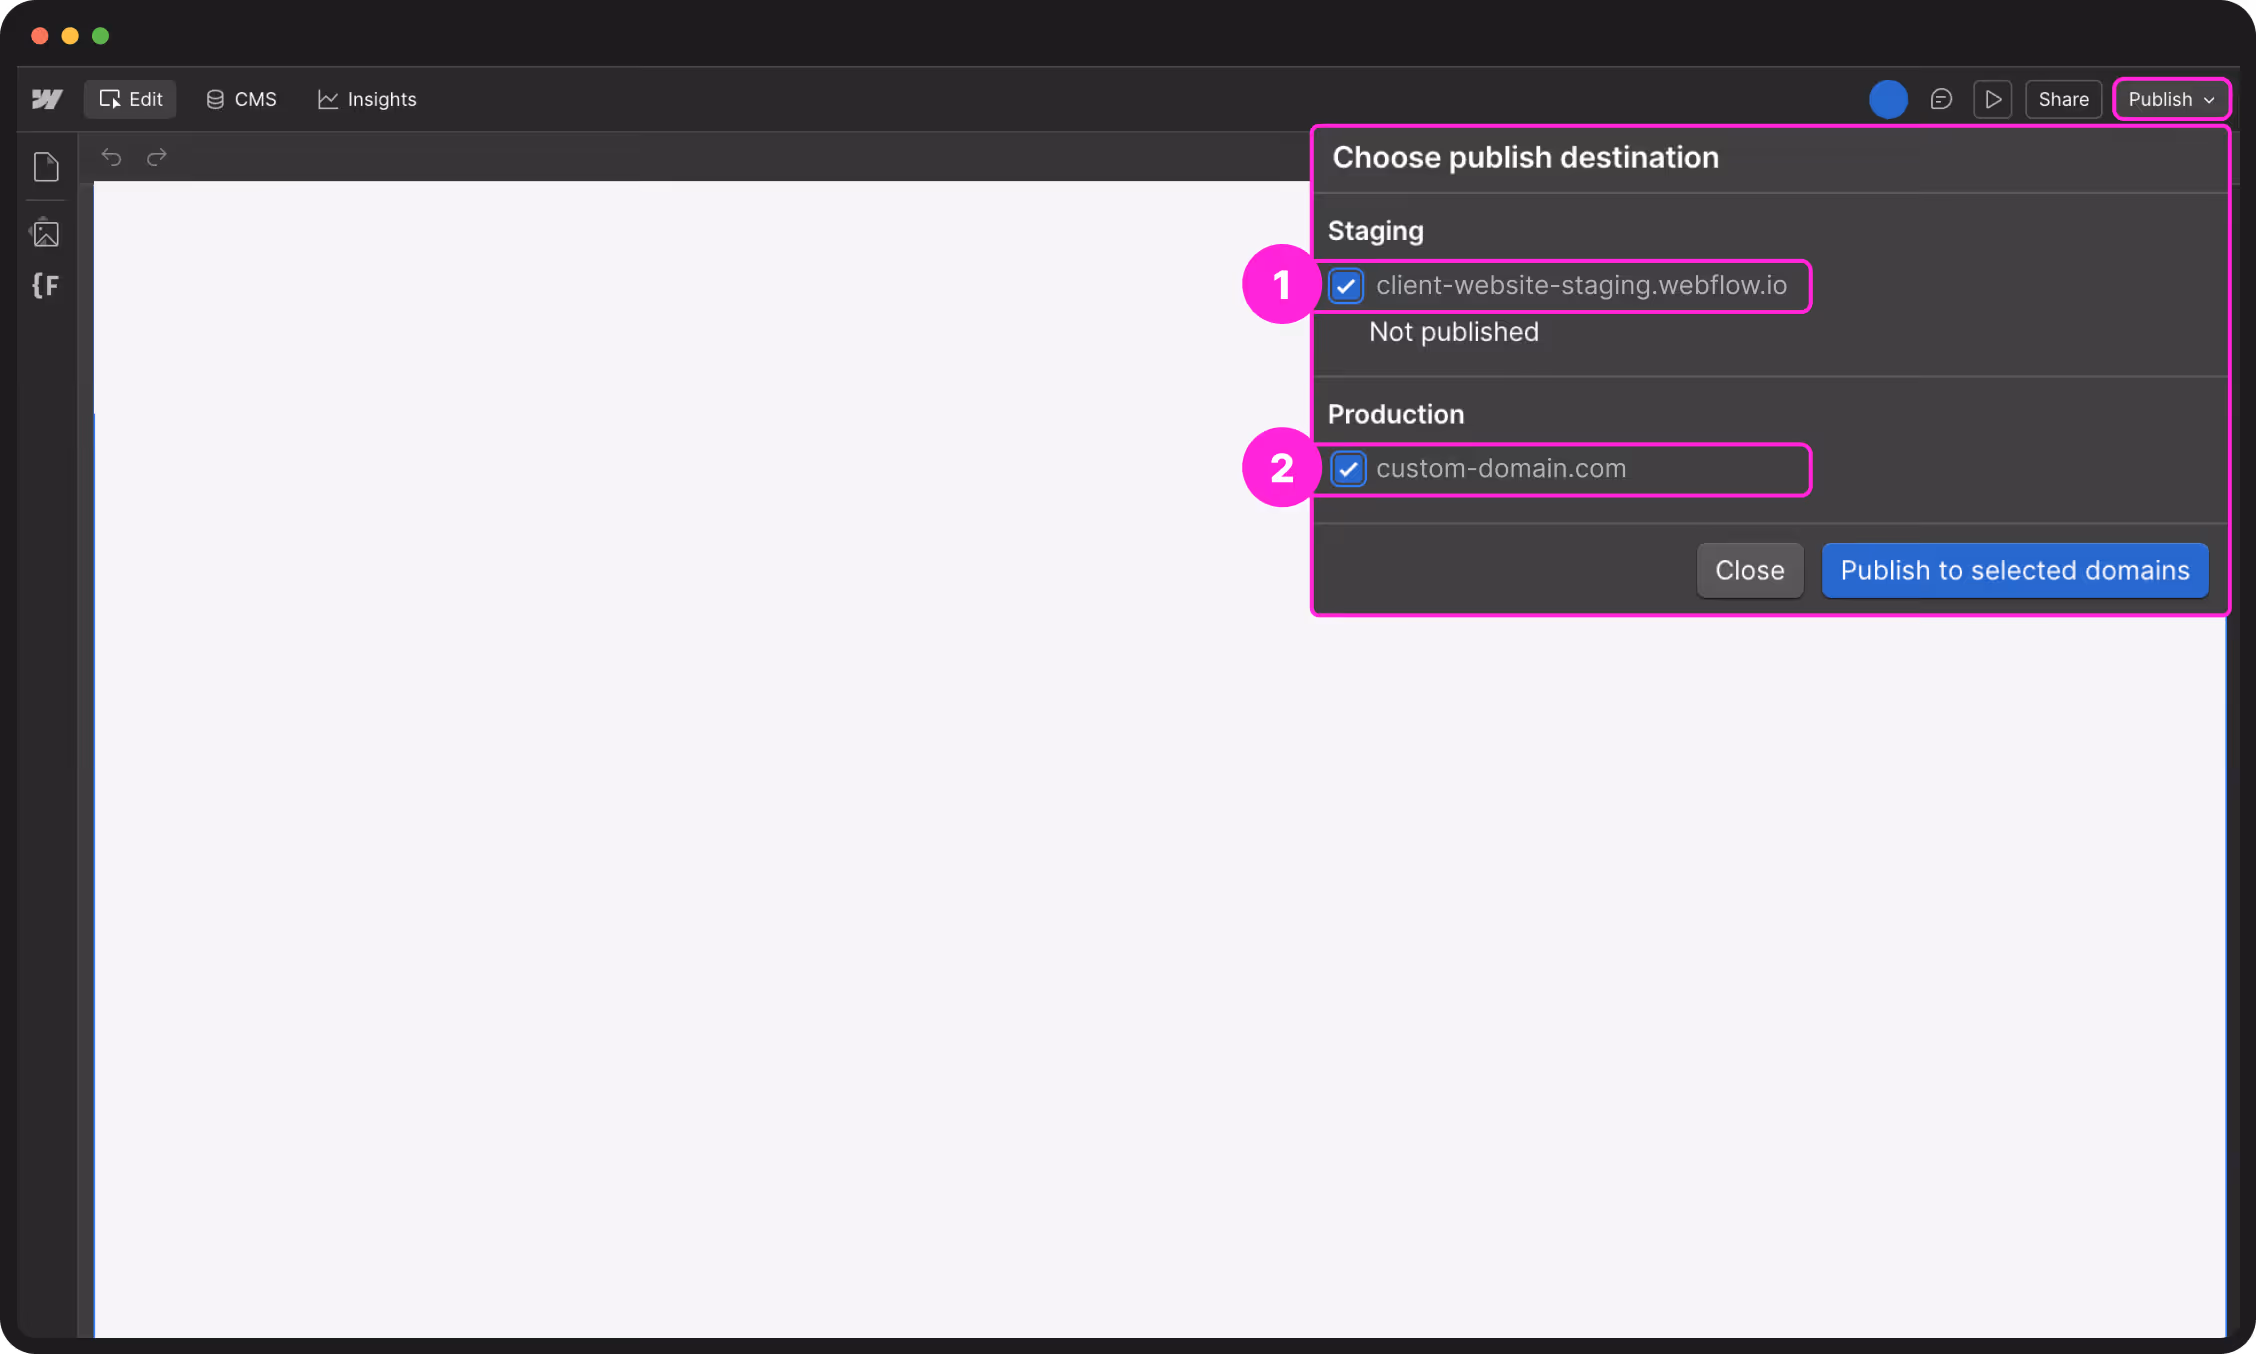
The Publish button is in the top-right corner of your screen. Click it to choose where your changes should appear:
- yoursite.webflow.io — This is your private staging link. Think of it as a waiting room where you can test things out before the public sees them.
- yourcompany.com — This is your live website. Only select this when you are ready for the world to see your updates.
Always publish to your .webflow.io link first. View it on your desktop and your phone to catch any small errors. Once you’re happy with how it looks, go back and publish to your live domain. This simple habit keeps your public site polished and error-free.
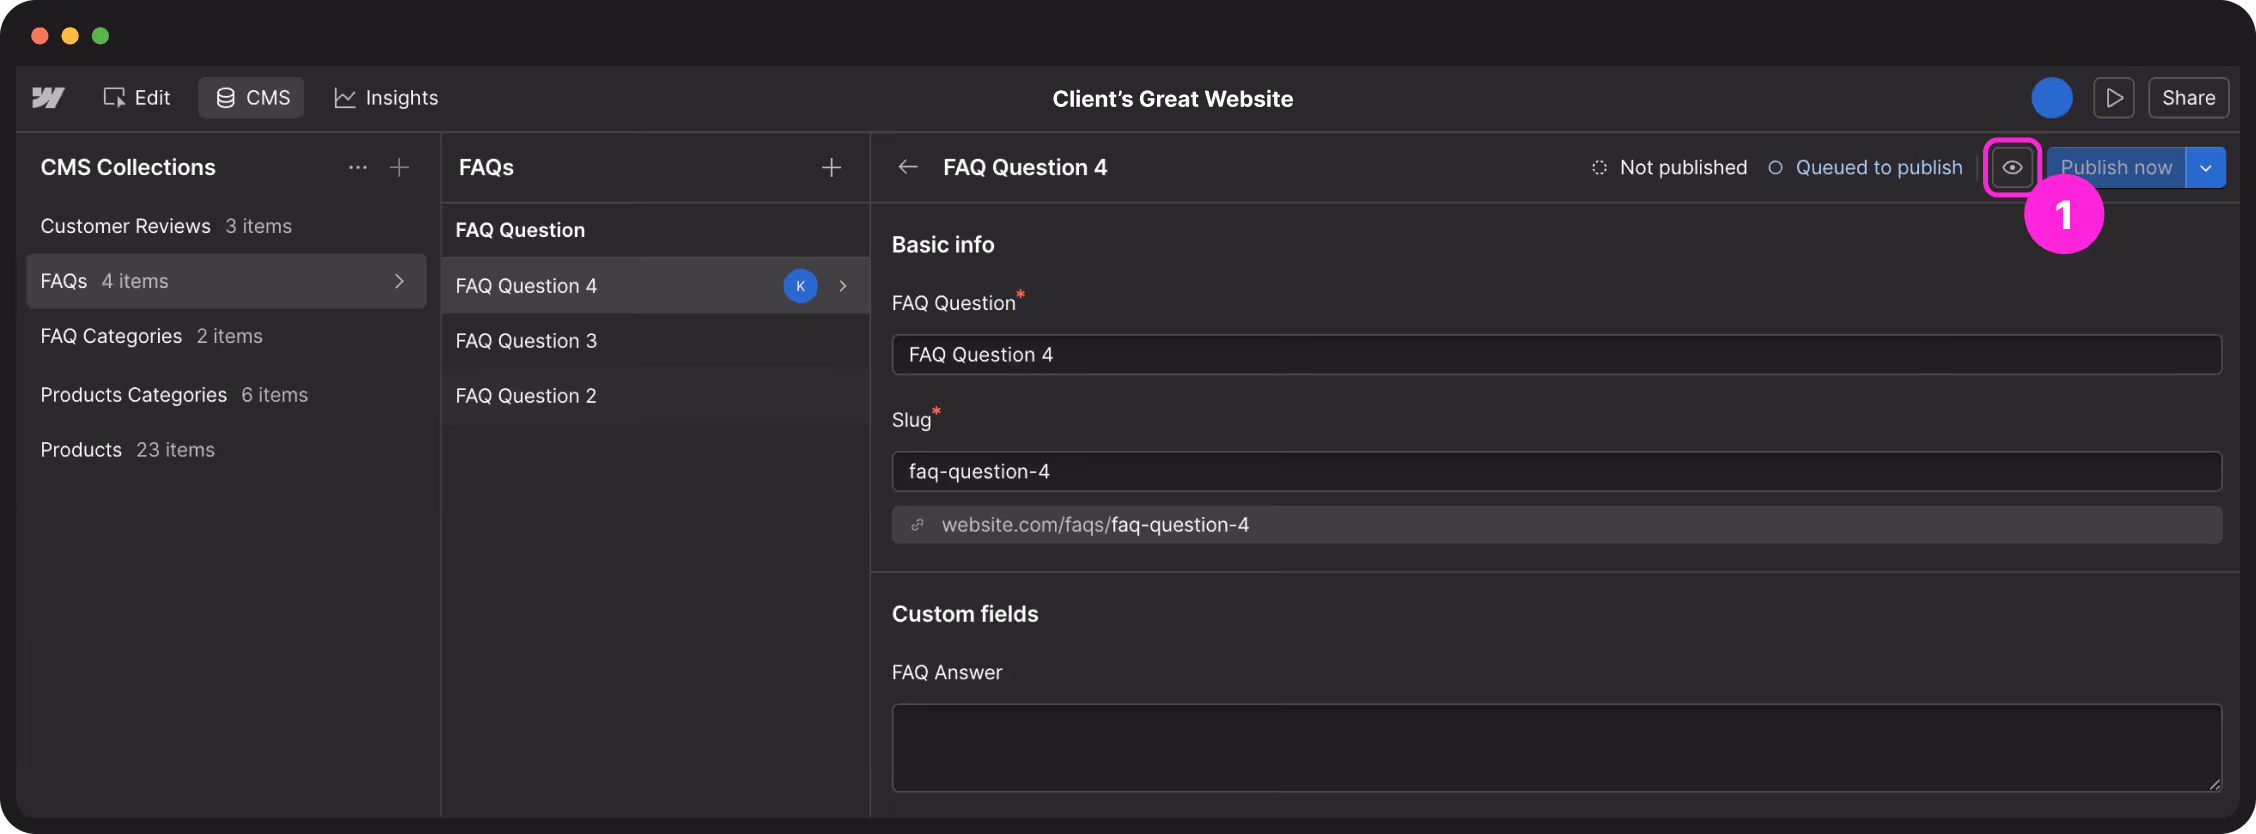
Publishing a single CMS item
Publishing multiple items at once
If you need to update several blog posts or team members at the same time, you can perform a bulk action:
You can also use this menu to Unpublish items if you need to take them off the site, or Save as draft if you want to keep your changes but aren't ready to share them yet.
Build mode
Build Mode is a powerful middle ground in Webflow. If it’s been set up as part of your project, it allows you to create new pages using a library of pre-built components. You get the flexibility to build layouts without the risk of touching the underlying code or breaking the site’s global design.
Build Mode is specifically for those assigned the Marketer role. If you only see options to edit text and images, you likely have the "Content Editor" role instead. If your workflow requires building new pages from scratch, let us know and we can update your permissions.
How the roles differ
To keep the site organised, Webflow uses three distinct levels of access:
| Mode | Capabilities | Role |
|---|---|---|
| Edit Mode | Update text, images, and links on existing pages. | Content Editor |
| Build Mode | Create new pages and drag in pre-approved components. | Marketer |
| Designer | Full control over layout, CSS styles, and custom code. | Admin / Developer |
Build Mode is ideal for launching landing pages, campaign updates, or promotional sections quickly. Because we’ve already set up the "guardrails," everything you drag onto the page will automatically match your brand’s fonts, colors, and spacing.
Building a new page

Components & Slots explained
Understanding these two terms is the key to using Build Mode effectively:
- Components — Think of these as "Master Blocks." They are pre-designed sections—like a contact form or a gallery—that we have built to be reusable. When you use a component, you can change the content inside it, but you don't have to worry about fixing the layout or mobile responsiveness; that’s already handled.
- Page Slots — Slots are the only places on a page where you can add or move components. If you try to drag a component and it won't "stick," you are likely trying to drop it outside of a permitted slot. This ensures that the core structure of the site remains stable.
Some components have "inner slots." This allows you to nest smaller blocks inside a larger one—for example, dropping a "Button" component into a "Hero" component. If a component feels too rigid, let us know and we can add more slots for flexibility.
What you can and can't do
| ✅ You can | 🚫 You can't |
|---|---|
| Create and name new pages. | Change global fonts or brand colors. |
| Add, reorder, or delete components. | Modify the margin or padding of a block. |
| Edit all text, images, and links. | Add custom code or third-party scripts. |
| Manage SEO titles and descriptions. | Alter the site’s main navigation menu. |
Check your URL slugs: Ensure your page link is clean and descriptive before publishing (e.g., /winter-sale is better than /page-version-2).
Review on Staging: Because you are building new layouts, it is vital to check the .webflow.io link on your mobile phone before pushing to the live site.
Don't force a design: If a component doesn't fit your needs, don't try to "hack" it. Request a new component that fits your specific goal.
If you have a specific page idea that our current components can’t handle, reach out. We can build and approve new components for your library, giving you more tools to work with in the future.
Performance & assets
A fast site keeps visitors happy and helps you rank better on Google. The single biggest win for site speed is managing your images well. Here is how to keep your assets lean and professional.
Uploading the right images
You don't need to be a professional editor to get this right. Start with a high-quality source image and ensure it’s cropped to the right shape (aspect ratio). Webflow’s built-in tools will then handle the heavy lifting by shrinking the file size for you.
Common shapes & targets
| Image Use | Shape (Aspect Ratio) | Target File Size |
|---|---|---|
| Full-width Banners | 16:9 (Wide) | Under 500KB |
| Standard Photos | 4:3 or 3:2 (Standard) | Under 300KB |
| Blog / News Cards | 16:9 or 1:1 (Square) | Under 150KB |
| Portraits / Headshots | 4:5 (Tall) or 1:1 (Square) | Under 100KB |
Best image formats
| Format | Best for | Why |
|---|---|---|
.webp / .avif |
All photos | Much smaller than JPEGs and PNGs at the same quality. Webflow can convert to these automatically. |
.svg |
Logos & Icons | Scales perfectly to any size and stays crisp with a tiny file size. |
Compressing images in Webflow
Webflow has a built-in tool that converts your existing images to modern formats like WebP or AVIF in under a minute.
Converting images to WebP or AVIF is permanent within Webflow. If you want to keep your original high-res JPEGs or PNGs, download them first or create a manual backup of your site before hitting compress.
Managing the Asset Manager
Press J in the Designer to open your central library. Good habits here keep the site healthy:
- Use descriptive filenames —
about-team-hero.webpis much better for SEO thanIMG_4832.jpg. - Organise with folders — Group items by section (e.g., Blog Images, Documents, Icons).
- Add alt text — Briefly describe every image for accessibility and search engine ranking.
- Delete unused assets — If a photo is no longer on a page, remove it from the library to save space.
Bandwidth management
You can check your data usage under Site Settings → General. To keep this number low, always host videos on YouTube or Vimeo rather than uploading them directly, and stick to the image optimization steps above.
Webflow hosts your site on a worldwide Content Delivery Network. This means your site loads just as fast for a visitor in London as it does in Melbourne, with no extra setup required from you.
Backups & safety
Webflow backs up your site automatically as you work. Because the platform keeps a detailed history of your changes, almost nothing you do is truly irreversible. You can experiment with confidence knowing a "undo" button always exists in your settings.
One of the best things about Webflow is the peace of mind it provides. If a layout breaks or a page is accidentally deleted, you can almost always roll back to a previous version in just a few clicks.
Three types of protection
- Automatic backups — These happen constantly in the background while you work (roughly every 50 saves). On our plan, these are unlimited, so you never have to worry about losing a day's work.
- Manual backups — These are "snapshots" that you create and name yourself. We recommend doing this before you start a big round of edits so you have a clear starting point to return to.
- Publish backups — Every time you hit the Publish button, Webflow automatically saves a restore point of the site exactly as it appeared at that moment.
Creating a manual backup
How to restore your site
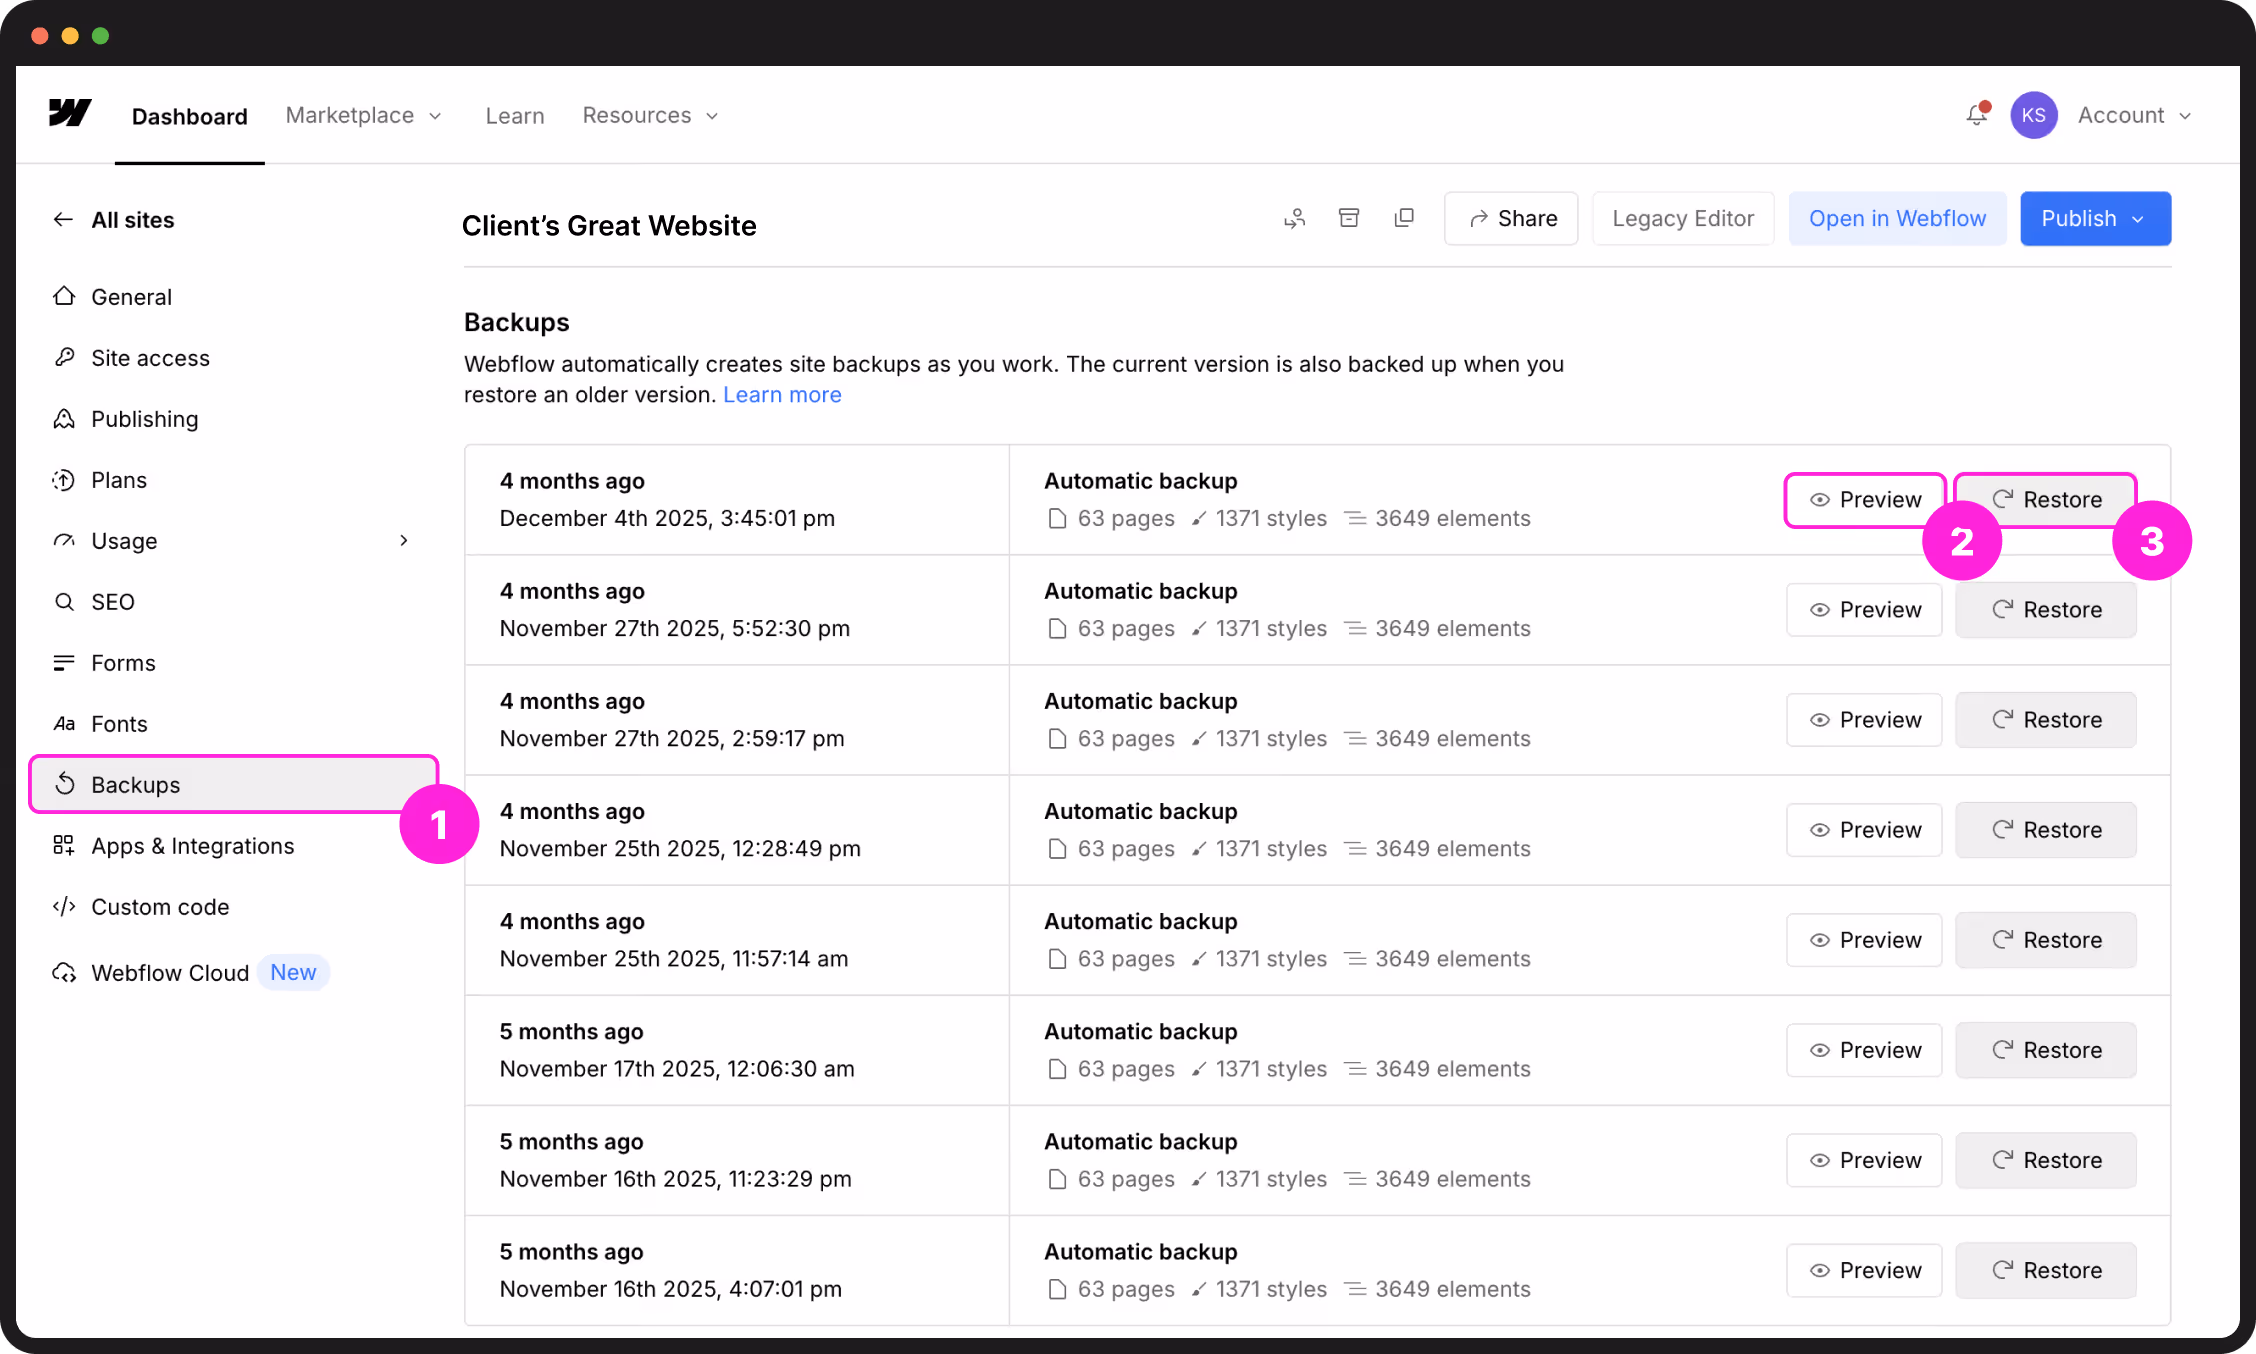
If you need to revert to a previous version, follow these steps. Note: Restoring a backup will overwrite all current changes in the Designer.
Safety best practices
- Name your backups — "Backup 5" is hard to remember; "Before SEO Changes" is easy.
- CMS Data — Backups save your layout and site structure, but it’s still a good habit to occasionally export your CMS data as a CSV for your own records.
- Preview first — Always use the "eye" icon to preview a backup before you hit Restore. It saves you from restoring the wrong version.
While Webflow's backups are great for small rollbacks, larger site overhauls or complex structural changes are often best handled with a professional eye. If you’re planning a significant expansion of your site or need a technical partner to manage a high-stakes migration, let’s coordinate on the next phase of your build.
Quick reference
Need to perform a task right now? Find the relevant category below for a high-speed walkthrough of the most common actions.
Editing & Content
| I want to… | Here's how |
|---|---|
| Open the Designer | Dashboard → Select Site → Open in Webflow |
| Edit text on a page | Click any text element → type directly on the canvas |
| Swap an image | Click image → gear icon → Replace Image → upload new file |
| Edit a Component | Double-click the component → edit content → Escape to exit |
| Update a page's SEO | Pages panel → gear icon → SEO settings → update → Publish |
Blog & CMS Management
| I want to… | Here's how |
|---|---|
| Write a new blog post | CMS panel (coins icon) → Collection → + New → fill fields → Save |
| Edit an existing post | CMS panel → Collection → click the item → edit → Save |
| Hide a post (Draft) | Open post in CMS → change status (top-right) to Draft → Save |
| Export CMS data | CMS panel → Collection → Export button (top-right) |
Publishing
| I want to… | Here's how |
|---|---|
| Publish the whole site | Publish button (top-right) → tick your domain → Publish to Selected Domains |
| Publish one CMS item | Open item in CMS → click the arrow next to 'Save' → Publish Item |
| Unpublish the site | Publish menu → Unpublish → select domains to take offline |
Pages & Redirects
| I want to… | Here's how |
|---|---|
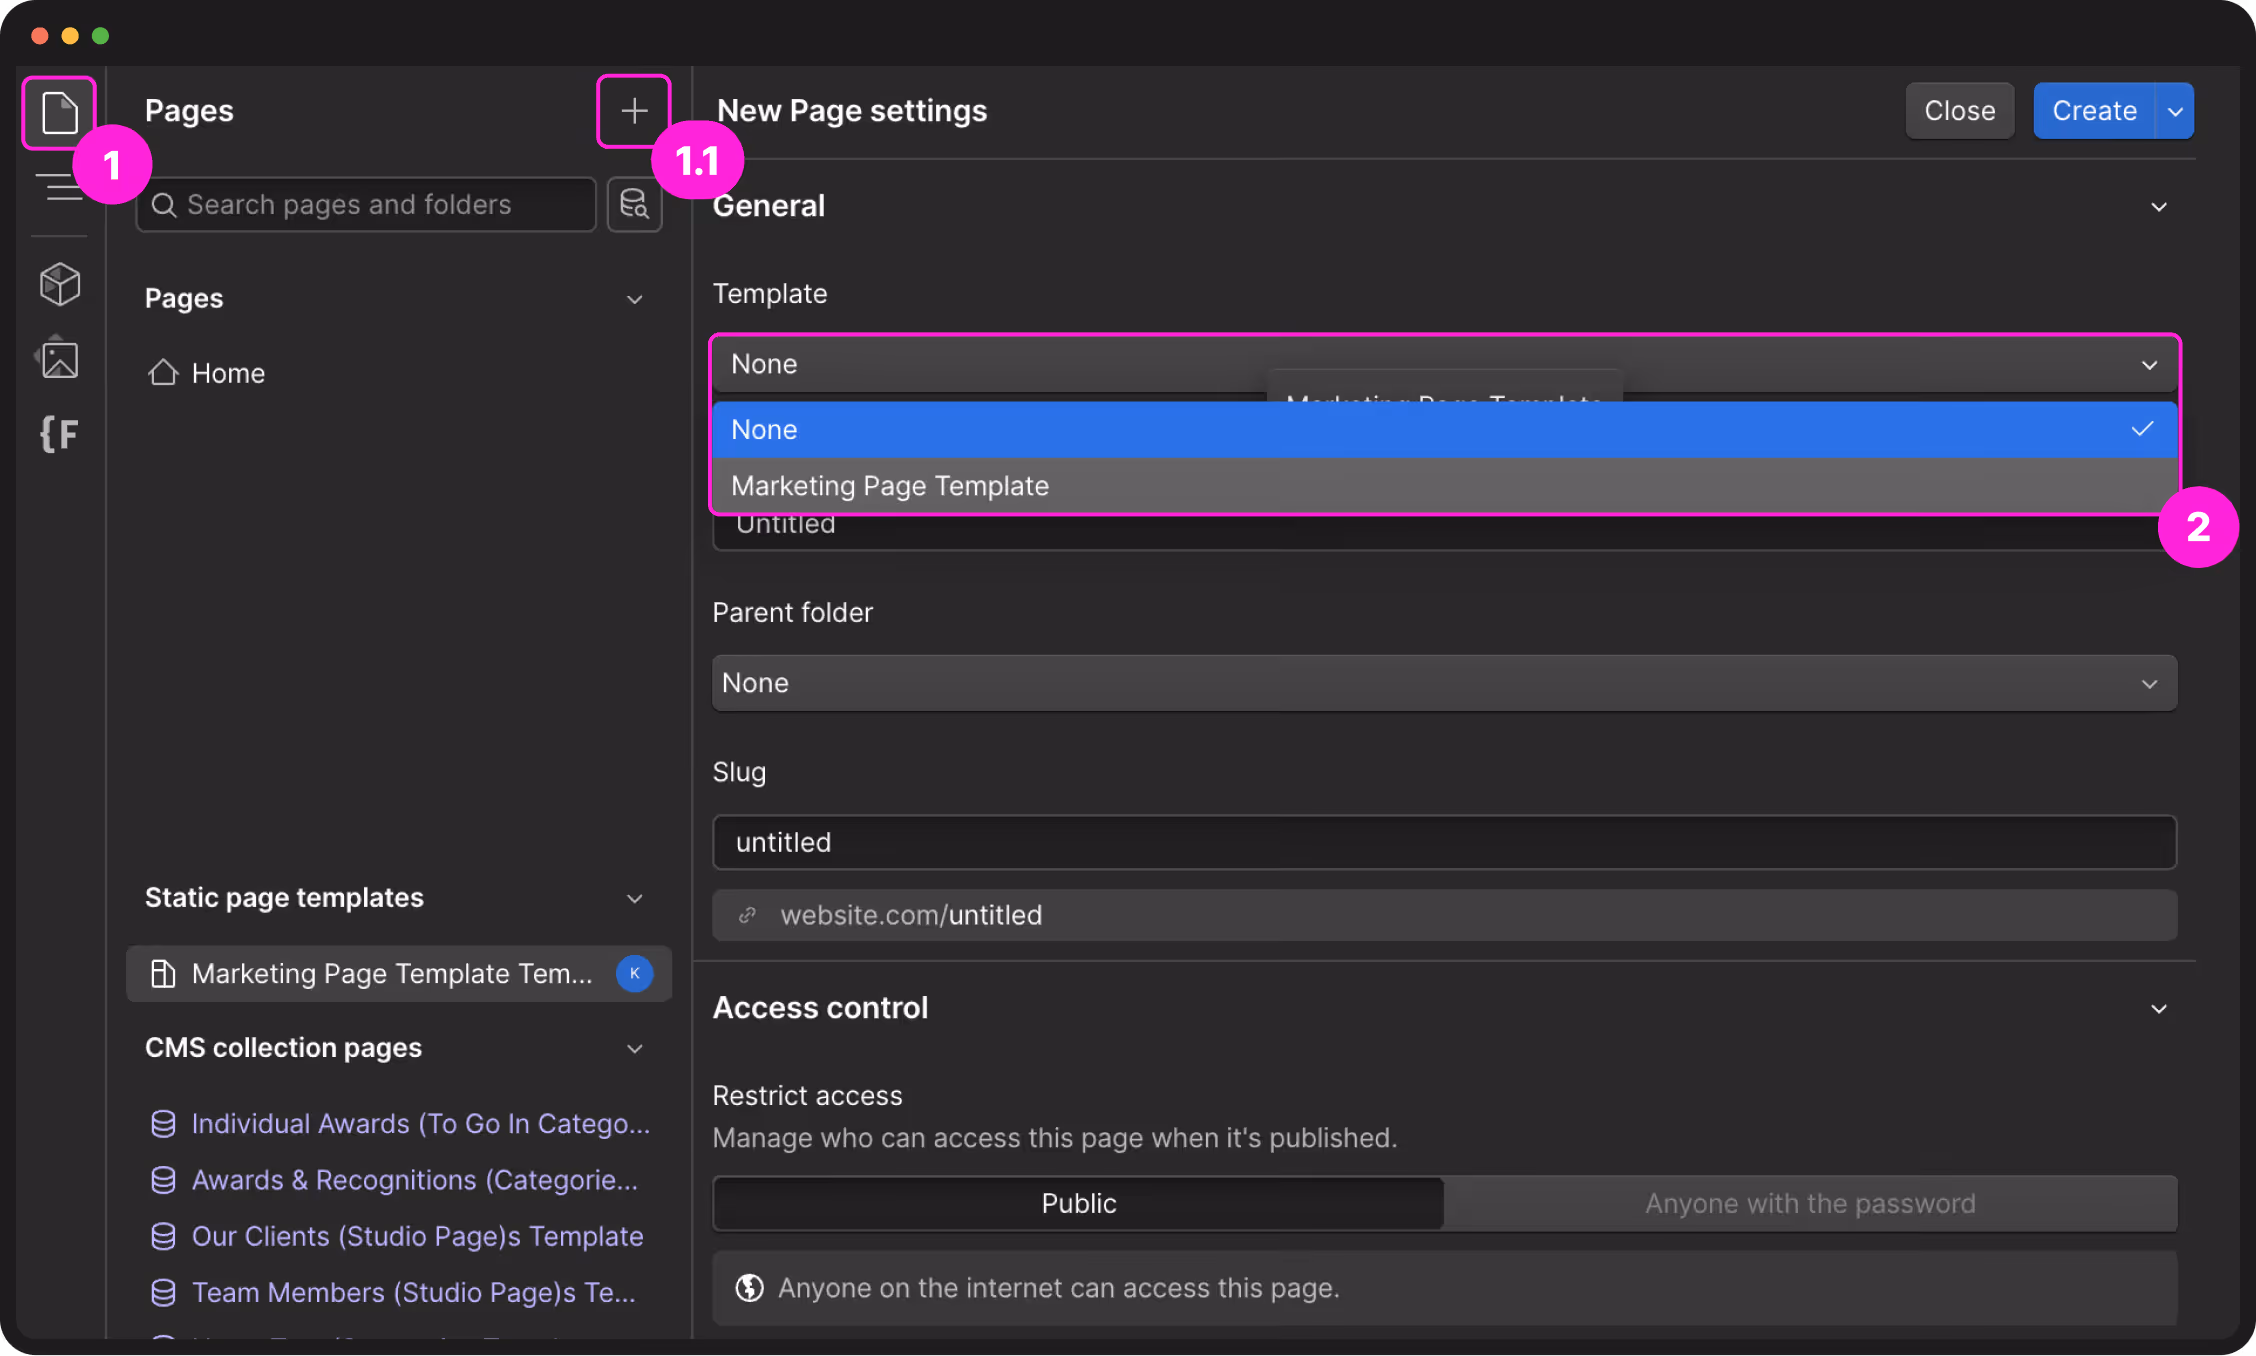
| Add a new page | Pages panel → + New Page → name it → Create → Publish |
| Change a URL (slug) | Pages panel → gear icon → URL slug field → update → Publish |
| Set up a 301 redirect | Site Settings → Publishing → 301 Redirects → add old + new paths |
| Password-protect a page | Pages panel → gear icon → Page Password → set password → Publish |
| Generate AI metadata | Pages panel → gear icon → SEO settings → ✨ Generate |
| Generate AI alt text | Assets panel (J) → click image → alt text field → ✨ Generate |
Leads & Performance
| I want to… | Here's how |
|---|---|
| View form submissions | Site Settings → Forms → scroll to table → View submissions |
| Export form leads | Site Settings → Forms → View submissions → Export all (CSV) |
| Update email alerts | In Designer → click Form → Settings (gear) → Email Notifications |
| Connect Analytics | Site Settings → Integrations → Google Analytics → paste G- ID → Save |
| Check Site Vitals | Designer → Analyze icon (chart) → check traffic & health stats |
Team & Collaboration
| I want to… | Here's how |
|---|---|
| Invite a Reviewer | Workspace Settings → Members → Invite → email → Reviewer role |
| Leave a design comment | Press 'C' on keyboard → click element → type feedback → Enter |
| Check usage limits | Site Settings → General → scroll to Usage section |
Backups & Safety
| I want to… | Here's how |
|---|---|
| Create manual backup | In Designer: Shift + Cmd/Ctrl + S → name the version → Save |
| Restore an old version | Site Settings → Backups → preview version → ⋯ → Restore |
| Compress an image | Assets panel (J) → select image → look for 'Compress' or WebP toggle |
Keyboard Shortcuts
| Action | Mac | Windows |
|---|---|---|
| Open Assets Panel | J | J |
| Create Manual Backup | Shift + Cmd + S | Shift + Ctrl + S |
| Quick Find (Elements) | Cmd + E | Ctrl + E |
| Toggle Preview Mode | Cmd + Shift + P | Ctrl + Shift + P |
| Enter Comment Mode | C | C |
| Hard Refresh Browser | Cmd + Shift + R | Ctrl + Shift + R |
| Undo Action | Cmd + Z | Ctrl + Z |
Scale with U&I Digital
We are your digital partners for the long haul. Beyond the initial build, we’re here to help you evolve your site as your business scales, whether that’s through new features, custom integrations, or conversion-led expansions.
Start a new phase
Expanding your site
Your website is a living product. As your business evolves, we are here to ensure your digital presence keeps pace. Here is how we typically partner with our clients on the next stage of their journey:
| Phase | What we focus on | The Outcome |
|---|---|---|
| Site Expansion | Building new high-converting landing pages, service templates, or seasonal campaign layouts. | Request a Project Brief |
| Systems Integration | Connecting your site to CRMs (HubSpot/Salesforce), advanced automation workflows, or membership portals. | Book Technical Discovery |
| Conversion Growth | Deploying Webflow Optimize for A/B testing, heatmaps, and data-driven UX refinements. | Book Strategy Session |
| Managed Updates | Handling complex structural changes, global branding refreshes, or high-stakes content migrations. | Request Technical Review |
Self-Service Resources
For quick "How-to" answers regarding native Webflow features, the official documentation is the most up-to-date resource available:
Forms & submissions
Whether it’s a simple contact page or a detailed project enquiry, all your form data is captured and stored securely. Here is how to find your submissions, update who gets notified, and keep spam out of your inbox.
If we have already helped you connect your forms to a tool like HubSpot, Mailchimp, or Typeform, your leads will automatically flow directly into those platforms. You can mostly ignore this section unless you need to access the "raw" backup data or change who receives the internal Webflow email alerts.
Viewing your submissions
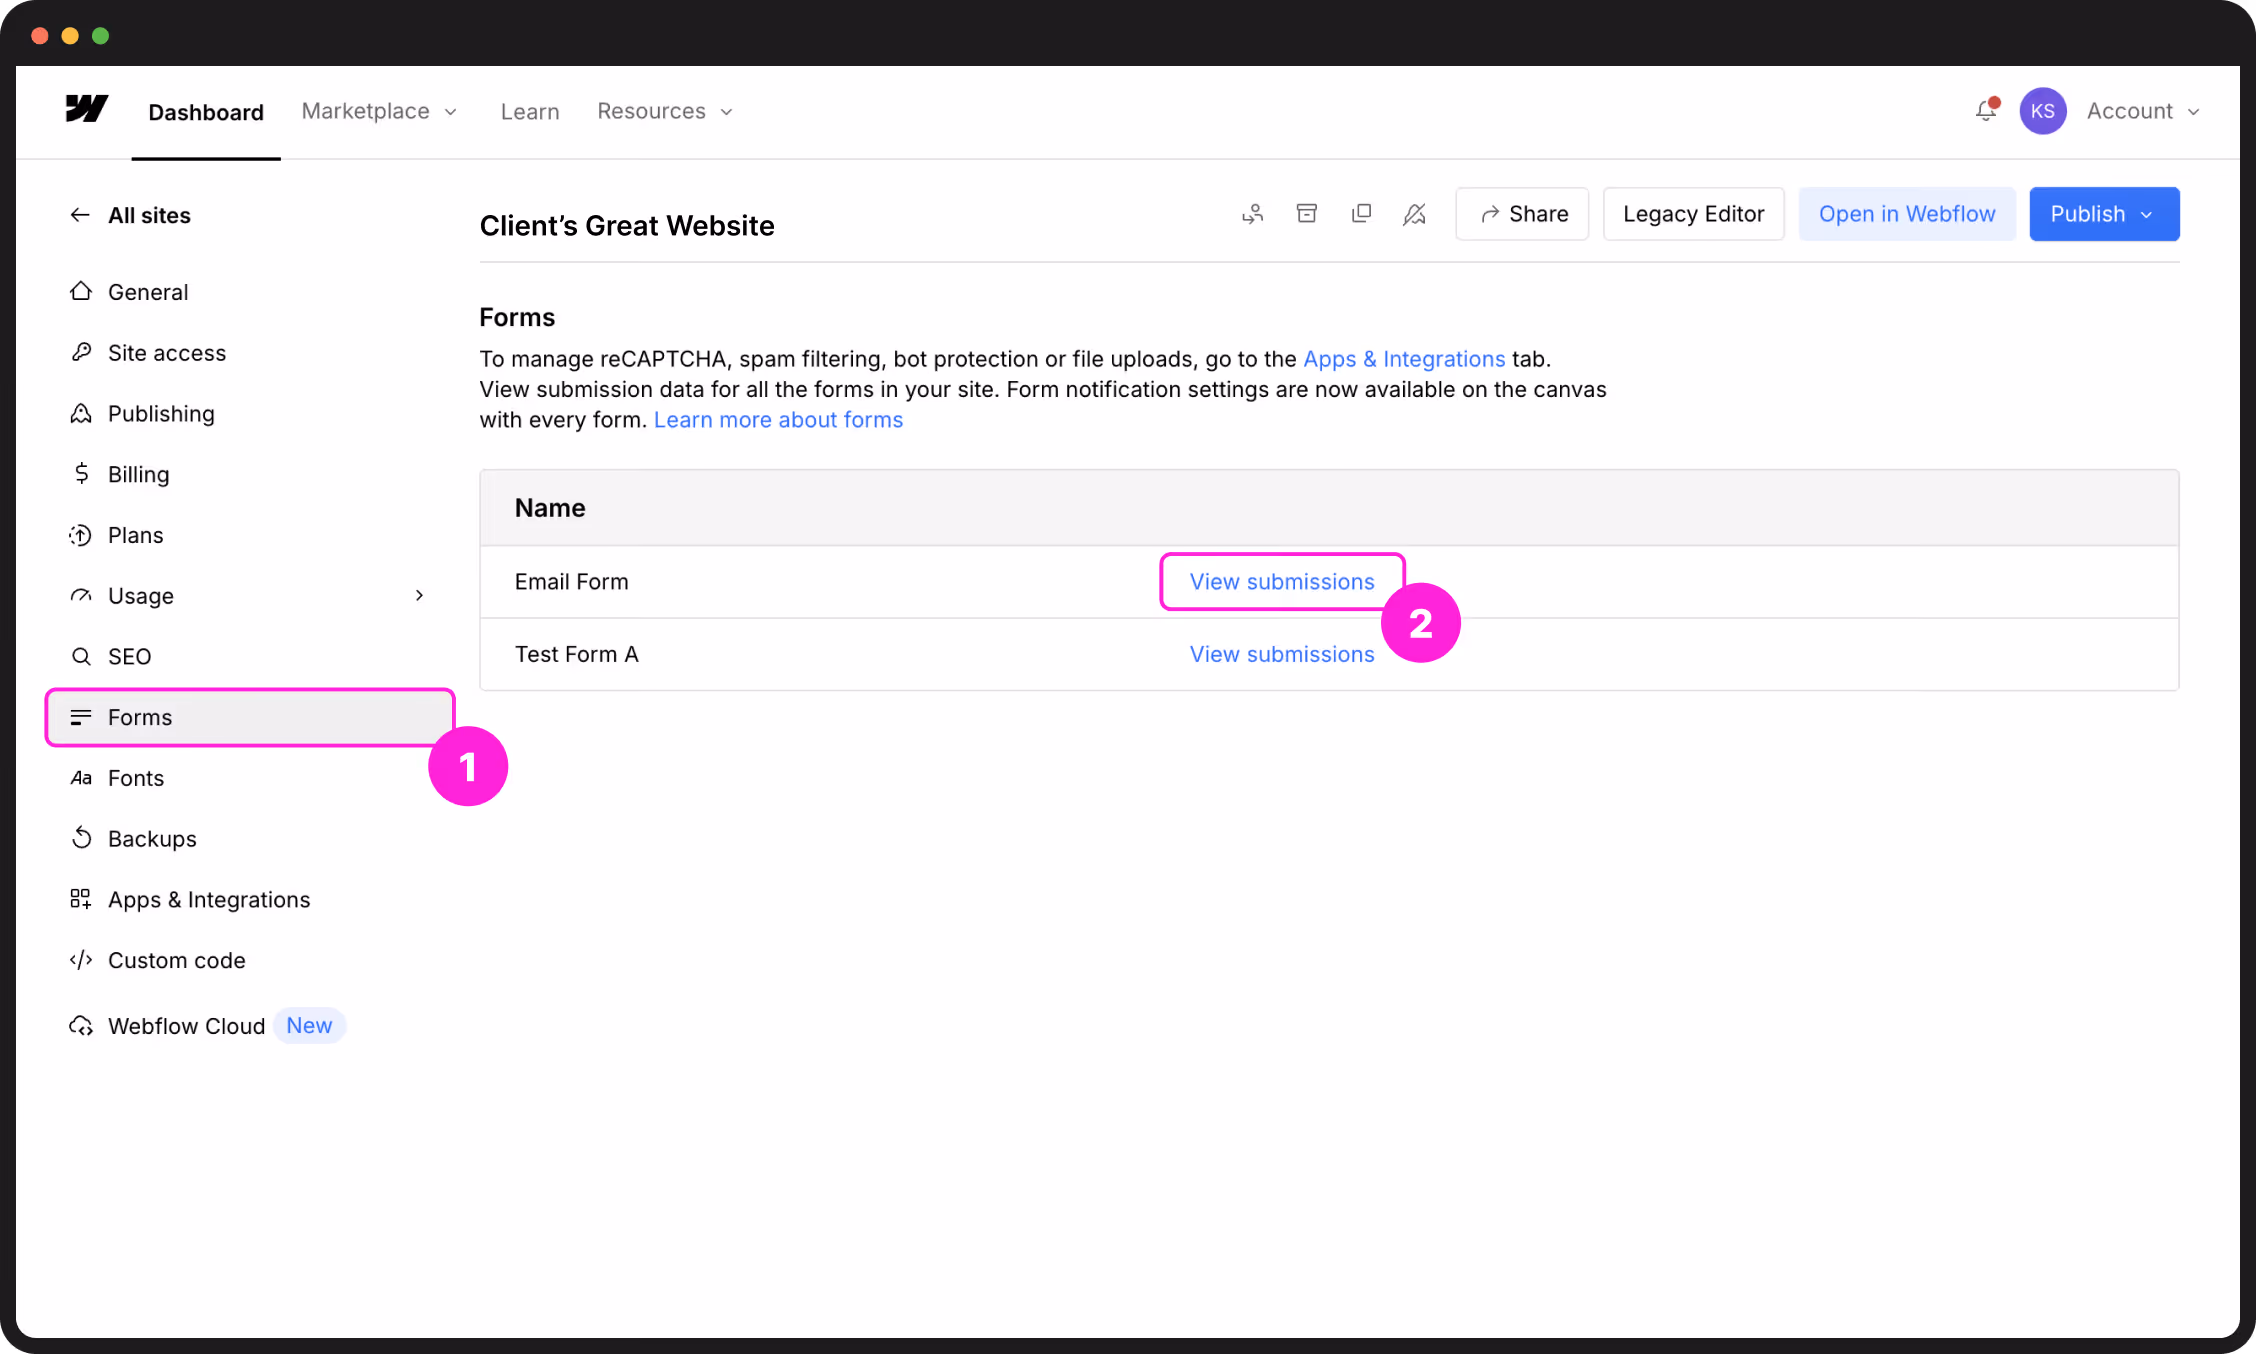
Webflow keeps a backup of every form filled out on your site. This is a great safety net in case an email notification accidentally ends up in your spam folder.
Downloading your data
If you need to move your leads into a spreadsheet or a mailing list, click the Export all button at the top of the table. We recommend doing this once a month to keep your own offline record of customer enquiries.
Changing who gets notified
When a form is submitted, Webflow sends an alert to the people you’ve chosen. You can update these addresses directly from the form itself while you are in the Designer.
While you’re in that popup window, you can also change the Subject Line or the Sender Name. This is helpful if you want your emails to say something specific like "New Website Lead" so they stand out in your inbox.
If notifications aren't arriving, check your spam folder first. We recommend using specific individual emails (like name@yourcompany.com) rather than generic ones (like info@), as generic addresses are more likely to be flagged as spam by mail providers.
Spam protection
To keep your inbox clean, we use Cloudflare Turnstile. This is a modern, invisible "bot check" that stops spam without forcing your real customers to solve puzzles.
- The Spam Tab — At the top of your submissions table, you'll see a Spam tab. Webflow automatically filters suspicious messages here so they don't clutter your main list.
- Manual Reporting — If a junk message makes it into your main list, tick the box next to it and click Report spam. This helps the system learn and block similar messages in the future.
Adding a new field or creating a completely new form requires a change to the site's structure. If you need a new way to collect information from your visitors, send us a quick brief and we’ll get it built for you.
SEO analytics
Data tells you what’s working and what isn’t. Webflow connects seamlessly to Google’s industry-standard tools and also features its own built-in dashboard so you can monitor your site's health at a glance.
Google Analytics (GA4)
Google Analytics tracks who visits your site, how they found you, and which pages they stay on the longest. If we’ve set this up for you, your Measurement ID is already hard-wired into the site settings.
How to connect your account
If you haven't connected Google Analytics yet, you can do it in a few minutes without any coding:
G-XXXXXXXXXX).Once you've published, open your live website in a new tab. Then, go back to Google Analytics and check the Realtime report. If you see "1 user" (that's you!), you've set it up correctly.
What to look for
You can view your full data at analytics.google.com. We recommend checking these three reports once a month:
- Traffic Acquisition — See if people are finding you through Google search, social media, or direct links.
- Pages and Screens — See which of your blog posts or service pages are the most popular.
- Realtime — See how many people are on your site this very second (perfect for checking if a new email blast or social post is driving clicks).
Built-in Analytics (Webflow Analyze)
While Google Analytics is the standard for deep-dive marketing data, Webflow Analyze is built directly into your site’s dashboard. It provides high-level, real-time insights into how your site is performing without the complexity of a separate platform.
The primary benefit of Analyze is its speed and integration. It allows you to see exactly which content is resonating with your audience the moment you log in to make updates. You’ll get clear data on:
- Engagement Trends — Track total unique visitors and page views over days, weeks, or months.
- Top Content — Identify which pages or blog posts are driving the most interest.
- Site Health — Monitor basic SEO and accessibility scores to ensure your site remains professional and searchable.
Webflow Analyze requires a specific site plan to activate. If you want to start measuring your site's performance directly from your dashboard, we can help you choose the right plan and handle the technical setup for you. Let’s get your data working for your business.
High-performance testing (Webflow Optimize)
If you are ready to move from simply tracking traffic to actively increasing your sales or enquiries, Webflow Optimize is the next step. It allows us to run data-driven tests on your live site to find out exactly what makes your visitors take action.
Instead of guessing which headline or button color works best, Optimize uses AI-driven testing and personalization to show different versions of a page to different visitors. The benefits for your business include:
- A/B Testing — Compare two versions of a section (like a Hero banner or a CTA) to see which one generates more clicks.
- Visual Heatmaps — See exactly where users are clicking and how far they are scrolling, so we can remove friction from the user journey.
- Personalization — Show specific content to visitors based on where they came from or their past behavior on the site.
- Conversion Lift — Automatically route more traffic to the "winning" version of a page to maximize your results in real-time.
Webflow Optimize is an advanced growth tool that requires a specific setup and strategy to be effective. If you're ready to stop guessing and start scaling your site's performance, let’s talk about integrating Optimize into your next growth phase.
Managing pages
Your website’s structure is controlled through the Pages panel. Whether you are adding a new landing page for a campaign or organising your existing content into folders, this is the command center for your site's hierarchy.
Creating new pages is perfectly safe. However, if you rename a URL slug or delete a page, any old links (from social media or Google) will lead to a "404 Not Found" error. To prevent this, you must set up a 301 Redirect immediately after making the change.
Setting up a 301 Redirect
A redirect ensures that visitors who click an old link are automatically sent to the new page. This preserves your SEO and keeps your traffic seamless.
/old-page-name)./new-page-name).When should you set up a redirect?
You should create a redirect immediately whenever you move content so you don't lose visitors. Common scenarios include:
- Renaming a page: For example, if you change
/servicesto/our-offerings. - Consolidating content: If you delete an old, short blog post and want to send people to a newer, more detailed one instead.
- Fixing URL typos: If you realize a URL slug was misspelled after you've already published and shared the link.
- Restructuring folders: If you move a page into a folder (e.g., changing
/team-memberto/about/team-member).
Adding and organising pages
The Pages panel lives in the left sidebar (the stacked pages icon). This is where you can see every static page on your site, as well as your CMS templates.
Creating a new page
Essential page settings
Every page has a Settings gear icon next to its name. Here are the three areas you should focus on:
- SEO Settings — This is where you write the Title and Meta Description that appear in Google search results. Keep these descriptive and include your target keywords.
- Open Graph (OG) Settings — This controls how the page looks when shared on LinkedIn or Facebook. You can upload a specific "preview image" here so your links always look professional.
- Password Protection — If you have a page that is for internal use or "clients only," you can set a custom password here. Only visitors with the password will be able to view the content.
If your site starts to grow, we can use Folders to group pages together (e.g., /services/plumbing). Folders help keep your "URL slugs" organized and make it easier for visitors to understand where they are on your site. If you're planning a content expansion, let’s chat about the best folder structure for you.
Adding a blank page is the first step, but if you need a custom-designed layout or a new set of components to bring that page to life, we’re here to help. We can build out new high-converting templates that snap right into your existing site structure.
SEO — the full picture
SEO (Search Engine Optimisation) is how you tell Google what your site is about so it can show it to the right people. Webflow gives you full control over every SEO element — here's how to manage it to keep your site performing well.
We have already configured your technical SEO foundations—including the sitemap, robots.txt, and site-wide structure. Your primary role moving forward is to ensure that your page-level content (titles and descriptions) stays accurate as you add new pages or blog posts.
Page-level SEO
Every page and CMS item has its own SEO settings. These are the "digital signposts" that Google reads first.
1. Title Tag
This is the blue clickable link that appears in Google search results. It should be under 60 characters. Make it descriptive and include your primary keyword near the start.
Example: Web Design Melbourne — U&I Digital
2. Meta Description
This is the short summary shown under the title. While it doesn't directly boost your "rank," it is what convinces people to click. Keep it under 155 characters and write it as a clear invitation to the user.
3. Open Graph (Social Sharing)
This controls how your page looks when shared on LinkedIn, Facebook, or iMessage. Always upload a high-quality Open Graph Image (1200x630px) in the settings so your links don't appear as a grey box when shared.
How to edit these settings
Smart URL Slugs
A URL slug is the web address after your domain (e.g., /about-us). For best results, keep slugs short, lowercase, and use hyphens between words.
- ✅ Better:
/services/web-development - ❌ Avoid:
/Page_1-v2-final
If a page is already live and you decide to change its URL slug, you must set up a 301 Redirect. If you don't, any existing links to that page will break. Check the Managing Pages section of this wiki for the step-by-step guide on setting up redirects.
The Sitemap
Your sitemap is a map of your site that helps Google find all your pages. We have already turned on "Auto-generate sitemap" in your settings, so Webflow updates this for you every time you publish.
If there is a page you don't want appearing in search results (like a "Thank You" page or a private draft), you can exclude it by going to that Page's Settings and toggling off Sitemap Indexing.
While we ensure your site is technically perfect for search engines, high-level SEO strategy (keyword research, backlink building, and content audits) is a continuous process. If you’re looking to scale your organic traffic or dominate a specific market, let’s talk about a dedicated growth strategy.
Comments & feedback
Webflow’s built-in commenting system allows your team to leave feedback directly on the page canvas. It eliminates the need for messy screenshots or long email chains by pinning every suggestion to the exact element it refers to.
How to leave a comment
Anyone with access to the project can enter "Comment Mode" to review the site and start a conversation.
Managing the conversation
- Replying — Click any existing comment bubble to type a reply. This is the best way to ask for clarification or confirm that a change is underway.
- Resolving — Once a change has been made, click the Checkmark icon on the comment. This hides it from the canvas but keeps it in your "Resolved" history for future reference.
- The Comments Panel — Click the Comments icon in the left sidebar to see a full list of every open thread across the entire site in one view.
Involving stakeholders (Reviewer Role)
You can invite clients or external team members to review the site without giving them the power to change the design. The Reviewer role is a free seat that allows people to browse and comment only.
Encourage your team to avoid giving feedback via email or Slack. When comments are pinned directly to the element in Webflow, there is zero ambiguity about what needs to change. It makes your review cycles faster and much more accurate.
If your team has gathered a list of significant new features or design changes through the commenting system, let’s sync up. We can help you prioritise these requests and map out the next development phase for your site.
Troubleshooting
Is something not behaving as expected? Before assuming there’s a technical bug, check these common scenarios. Most "issues" in Webflow are simply a matter of a pending publish or a browser cache that needs clearing.
Find your situation below and tap to expand the fix.
Publishing & Visibility
- Did you actually publish? Edits in the Designer are saved, but they do not go live until you click the blue Publish button and select your custom domain.
- Perform a 'Hard Refresh'. Your browser often "remembers" the old version of the site to save time. Press
Cmd+Shift+R(Mac) orCtrl+Shift+R(Windows) to force the browser to fetch the latest version. - Check the tick-boxes. Ensure your live domain (e.g.
yourcompany.com.au) is actually ticked in the publish menu, not just the staging link.
Don't panic. Navigate to Site Settings → Backups. Find the version from just before the mistake, preview it to confirm it's correct, and hit Restore. You will then need to republish that restored version to make the live site match.
Forms & Enquiries
- Check the Spam folder. Automated emails are sometimes flagged by strict corporate filters.
- Verify the 'Send To' address. Ensure there are no typos in the email list within the form's settings.
- Avoid 'Role' addresses. Generic emails like
info@oradmin@are often blocked. We recommend using a specific individual’s email for higher deliverability.
Ensure Cloudflare Turnstile is enabled in your Apps & Integrations settings. This provides invisible bot-blocking. If a specific bot is still getting through, mark the submission as "Report Spam" in your submissions table to train the filter.
Site Performance & Content
- Republish the site. If you replaced an image in the Assets panel, it won't swap on the live site until a new publish is completed.
- Check the original file. Ensure you didn't upload a tiny thumbnail by mistake. Always provide a high-quality source and let Webflow's WebP compression handle the file size.
Content edits rarely break mobile responsiveness, but design changes can. If an element is overlapping or cut off on your phone, this usually requires a technical adjustment in the Designer. Take a screenshot and send it over—we can refine the mobile breakpoints for you.
Deleted CMS items (like blog posts or team profiles) are permanent and cannot be restored via a standard site backup. This is why we recommend setting items to Draft instead of deleting them. If it's a critical loss, reach out—we may be able to help you reconstruct it.
If you’re running into "limitations"—like hitting your form submission cap or needing more complex logic—this is a sign your business is growing. Instead of just "fixing" the limit, let’s talk about a site plan upgrade or a structural expansion to support your next stage of growth.
Site plans & billing
Your Webflow site runs on a paid Site plan. This covers your high-performance hosting, custom domain connection, and access to essential features like the CMS and form processing. Here is how to navigate your billing and plan for growth.
Workspace vs. Site Plans
Webflow uses two separate billing systems. It is important to know the difference so you aren't paying for more than you need:
| Plan Type | What it covers | Billed |
|---|---|---|
| Workspace Plan | Your "Office." Covers team seats and how many internal projects you can have. | Per Workspace |
| Site Plan | Your "Shopfront." Covers hosting, security, and CMS limits for one specific URL. | Per Individual Site |
Choosing the right Tier
Most professional sites sit on one of the following tiers. As your traffic or content library grows, you can scale these up instantly:
| Plan | Best For | Key Limits |
|---|---|---|
| CMS | Content-driven sites and blogs. | 2,000 CMS items, 100k monthly visits. |
| Business | High-traffic marketing sites. | 10,000 CMS items, 300k monthly visits. |
| Enterprise | Large-scale corporate organisations. | Custom limits & advanced security. |
To check your current status: Site Settings → Plans. You’ll see your usage stats and how close you are to your current limits.
When you hit a limit
Hitting a limit is actually a sign of success, it means your site is growing. Here are the most common "ceilings":
- CMS Items — The total number of records (blog posts, team members, etc.) in your database. If you hit 2,000 on a CMS plan, you'll need to move to Business to keep adding content.
- Monthly Visits — The number of people viewing your site. Webflow won't "shut down" your site if you spike over your limit once, but if you consistently exceed it, they will ask you to move to the next tier.
- Bandwidth — The amount of data served to visitors. This is why we emphasise image optimisation, smaller images mean you can handle more traffic on a lower plan.
If your site is live and generating results, we always recommend switching to yearly billing. It usually works out to a 30% discount compared to paying month-to-month. You can toggle this in the Plans tab.
Upgrading your plan
While upgrading is seamless, downgrading to a lower plan can be destructive. For example, moving from a CMS plan to a Basic plan will permanently delete your CMS database and break any pages that rely on that content. Before reducing your plan tier, ensure you have manually deleted or converted any CMS-dependent elements to static ones to avoid site-wide errors.
If you find yourself frequently hitting limits or needing Enterprise-grade features (like Single Sign-On or advanced security), it might be time for a structural review. We can help you navigate the transition to higher-tier plans or custom Enterprise solutions as your business scales.
Webflow AI tools
Webflow has integrated AI directly into the Designer to help you accelerate everyday content tasks. From generating accessible alt text to drafting SEO metadata, these tools are designed to handle the heavy lifting so you can focus on strategy.
We typically enable Webflow AI during your initial setup. If you don't see the sparkling ✨ Generate icons mentioned below, head to Workspace Settings → General and ensure the Webflow AI toggle is turned on.
AI-Powered SEO & Metadata
Manually writing SEO titles and descriptions for dozens of pages can be a bottleneck. Webflow’s AI can scan your actual page content and provide a high-quality first draft in seconds.
How to generate metadata
Automated Alt Text for Images
Alt text is vital for accessibility (screen readers) and helps Google understand your imagery. You can now use AI to describe your images automatically.
Individual & Bulk Generation
The SEO & Accessibility Audit
Webflow includes a powerful audit tool that acts as a "safety check" for your site. It scans for missing alt text, broken links, and empty SEO tags.
Access it via the Analyze icon (chart icon) in the left panel, then select the SEO tab. Running this audit periodically, especially after a large content update, ensures your site remains professional and fully optimised for search engines.
While these tools are incredibly efficient, they can occasionally hallucinate or miss the specific context of your business. Always perform a final human review of any AI-generated content to ensure it aligns with your brand's standards and accuracy.
Webflow's AI capabilities are expanding rapidly, including features for advanced layout generation and data mapping. If you're looking to integrate custom AI workflows or automated content pipelines into your site, let's talk about how we can build a more intelligent foundation for your next project.
Get more from your site
Your site is already built on a solid foundation — but Webflow offers a suite of add-on tools that can take it further. This section gives you an honest overview of what's available, what each one does, and whether it might be worth exploring for your business. None of these are required — but they can make a real difference as you grow.
All of these are available as add-ons to your existing Webflow plan. If something catches your eye, get in touch and we can walk you through what's involved, what it costs, and whether it's the right fit for where your business is heading.
Webflow Analyze — understand your visitors
Webflow Analyze is a native analytics dashboard built directly into your Webflow site — no third-party tools, no setup required. It gives you a clear picture of how people are finding and using your site.
What it shows you
| Metric | What it tells you |
|---|---|
| Page views & unique visitors | How many people are visiting your site, and which pages they're reading |
| Traffic sources | Where visitors are coming from — Google, social, direct, referrals |
| Top performing pages | Which content is resonating — useful for deciding what to write more of |
| SEO insights | Pages missing titles or meta descriptions, Core Web Vitals scores |
| Accessibility audit | Missing alt text, contrast issues, and other accessibility gaps |
Unlike Google Analytics, Analyze lives inside Webflow itself — so you can check your site performance without switching tools. It's designed to be simple and actionable rather than overwhelming.
Who it's best for
- Businesses that want quick, clear performance data without the complexity of Google Analytics.
- Teams that want to make content decisions based on what's actually working on the site.
- Anyone who wants built-in SEO and accessibility monitoring on an ongoing basis.
We can walk you through what Analyze would show for your specific site and whether it adds value on top of any analytics you already have set up.
Webflow Optimize — test what works
Webflow Optimize is an A/B testing and personalisation tool built natively into Webflow. It lets you run experiments on your own site without needing a developer or a separate testing platform.
What you can do with it
- A/B testing — create two versions of a page (e.g. two different headlines or call-to-action buttons) and automatically split traffic between them. Webflow tells you which version converts better.
- Personalisation — show different content to different audiences. For example, show a different hero message to visitors coming from Google Ads vs. organic search, or to mobile vs desktop users.
- AI-driven optimisation — let Webflow's AI automatically serve the best-performing variation to each visitor in real time, without waiting for a test to reach statistical significance.
A real-world example
Imagine your homepage hero says "Digital experiences that convert." You want to test whether "We build websites that grow your business" works better. Optimize splits your traffic 50/50, tracks enquiry form submissions from each version, and after enough data tells you which headline drives more leads. No guessing, no assumptions.
Who it's best for
- Businesses running paid advertising — even small improvements in landing page conversion can significantly reduce cost-per-lead.
- Sites with clear conversion goals — enquiry forms, bookings, sign-ups, product purchases.
- Marketing teams who want to move fast and test ideas without waiting for developer time.
We can help you identify the right pages and hypotheses to test, set up the experiments, and interpret the results.
AI add-ons — work faster with less effort
Webflow has been building AI directly into the platform at a fast pace. Some of these features are already included in your plan — others are available as add-ons or through the way we build and configure your site. Here's what's worth knowing about:
AI content generation
Webflow's built-in AI can draft SEO titles, meta descriptions, and alt text across your entire site in minutes — saving hours of repetitive writing. We covered this in the Webflow AI Tools section, but it's worth flagging here too: if you haven't started using it yet, you're leaving time on the table.
AI site builder & page generation
Webflow can generate entire new pages from a text prompt — useful for quickly spinning up landing pages for campaigns, events, or new service areas. The output needs design review (it won't match your brand out of the box), but it's a fast starting point. We can take AI-generated page structures and style them to match your existing site.
Webflow AI assistant
Inside the Webflow Designer, there's a built-in AI assistant that can answer questions about how to do things in Webflow, suggest improvements to content, and help troubleshoot issues. It's like having a Webflow-specific help desk inside the tool itself.
Content at scale — CMS + AI workflows
For clients with large content needs — many blog posts, product descriptions, location pages — we can set up workflows that use AI to draft content at scale, feed it into your Webflow CMS, and have it ready for human review before publishing. This is particularly useful for:
- Businesses with many locations that need unique location pages.
- E-commerce sites needing product descriptions for large catalogues.
- Content marketing teams that want to increase publishing frequency.
Any of these tools can be added to your existing setup — and we handle the configuration so you don't have to figure it out yourself. Whether it's setting up your first A/B test, getting Analyze running alongside Google Analytics, or building an AI content workflow, we're here for it. Get in touch →